openEQUELLA 2020.2 Features Guide
Table of Contents
- New UI Settings pages
- Search settings
- New UI Search page
- Dependency upgrades
- Blackboard LTI And REST Enhancements
New UI Settings pages
A number of pages within Settings have been updated with new Material UI components. A consistent template has been applied to these pages, which includes a panel with the configuration settings on the left, and a Save panel on the right. The Save button is only enabled if a change has been made to at least one configuration setting.
Settings pages with new UI include:
-
General - Login notice editor
-
Search – Content indexing
-
Search – Faceted search
-
Search – Search filters
-
Search – Search page
-
UI - Theme editor
Eventually all Settings pages will use this template.
An example of the Content indexing page with no changes (SAVE button disabled) is shown in Figure 1.

Figure 1 Content indexing page with SAVE button disabled
An example of Content indexing page with changes (SAVE button enabled) is shown in Figure 2.
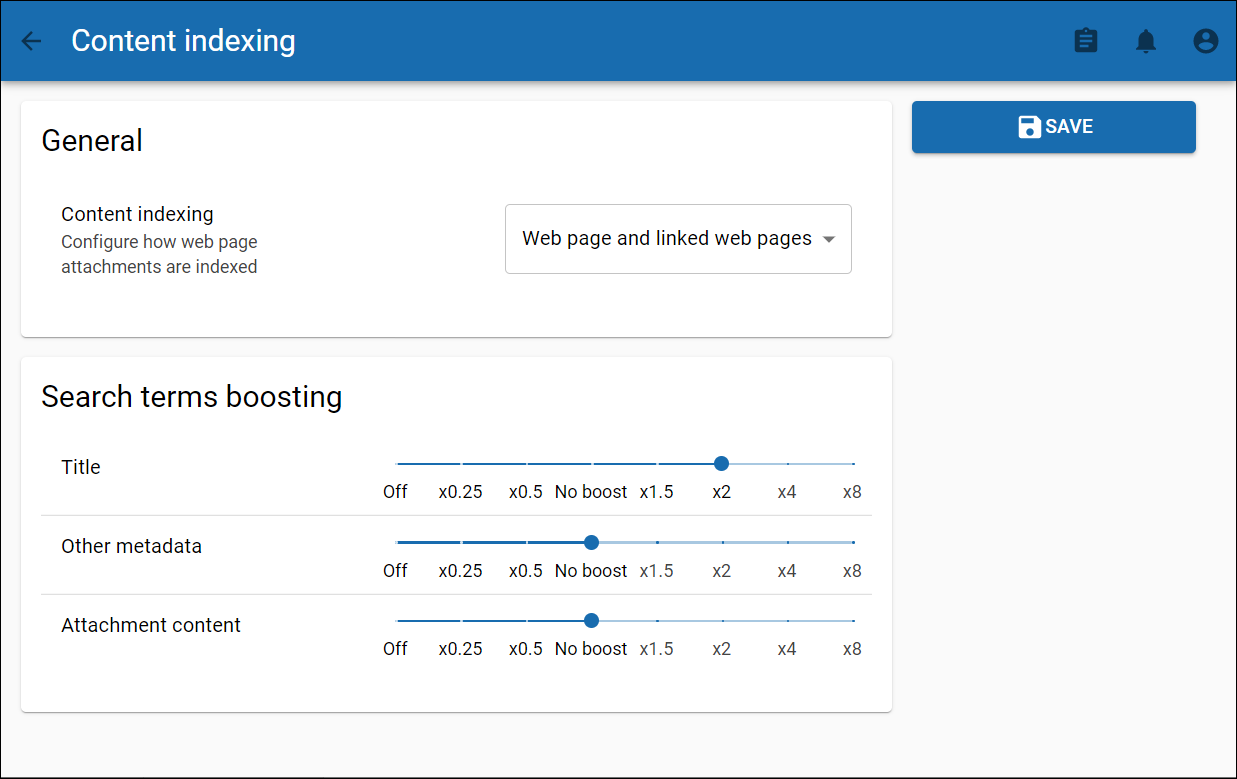
Figure 2 Content indexing page with SAVE button enabled
If a user navigates away from one of these settings pages without saving changes, a confirmation dialog displays. An example is shown in Figure 3.
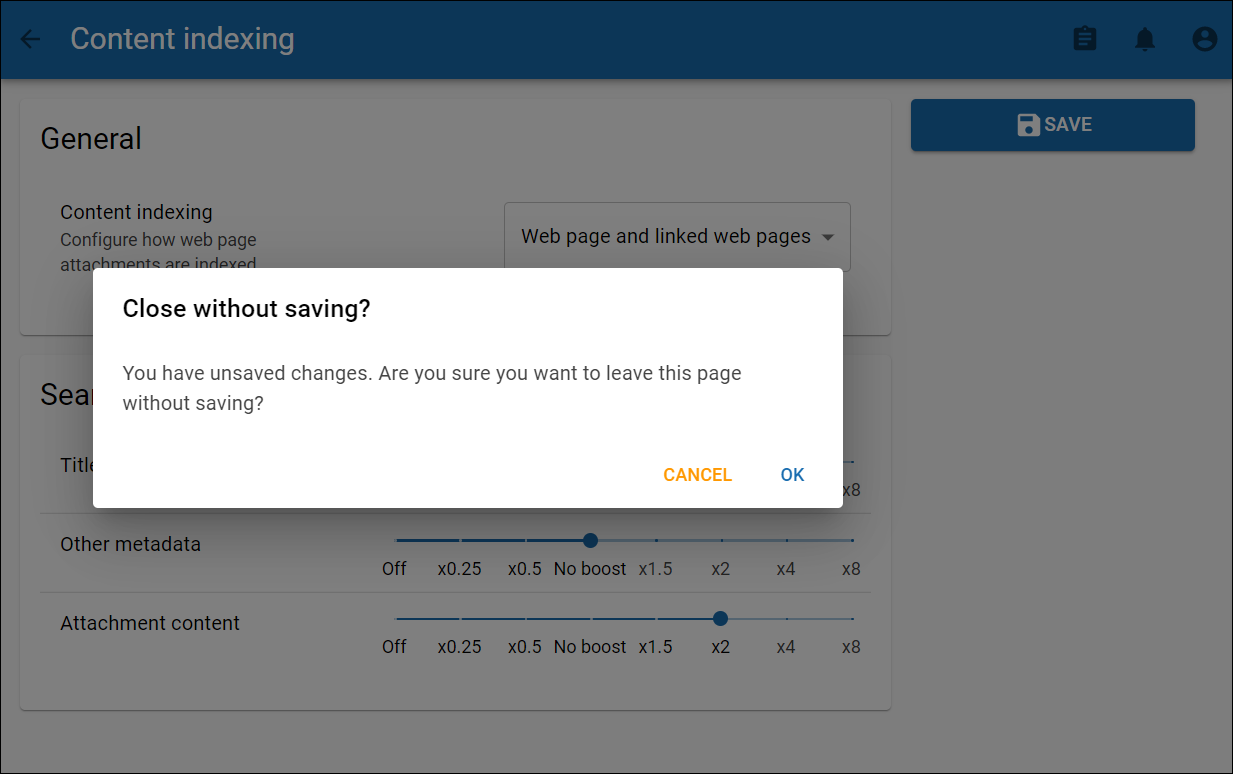
Figure 3 Confirmation dialog
Search settings
In openEQUELLA 2020.2 a new Settings category has been created called Search which is made up of sub-categories containing all existing and new configuration options relevant to the openEQUELLA Search page.
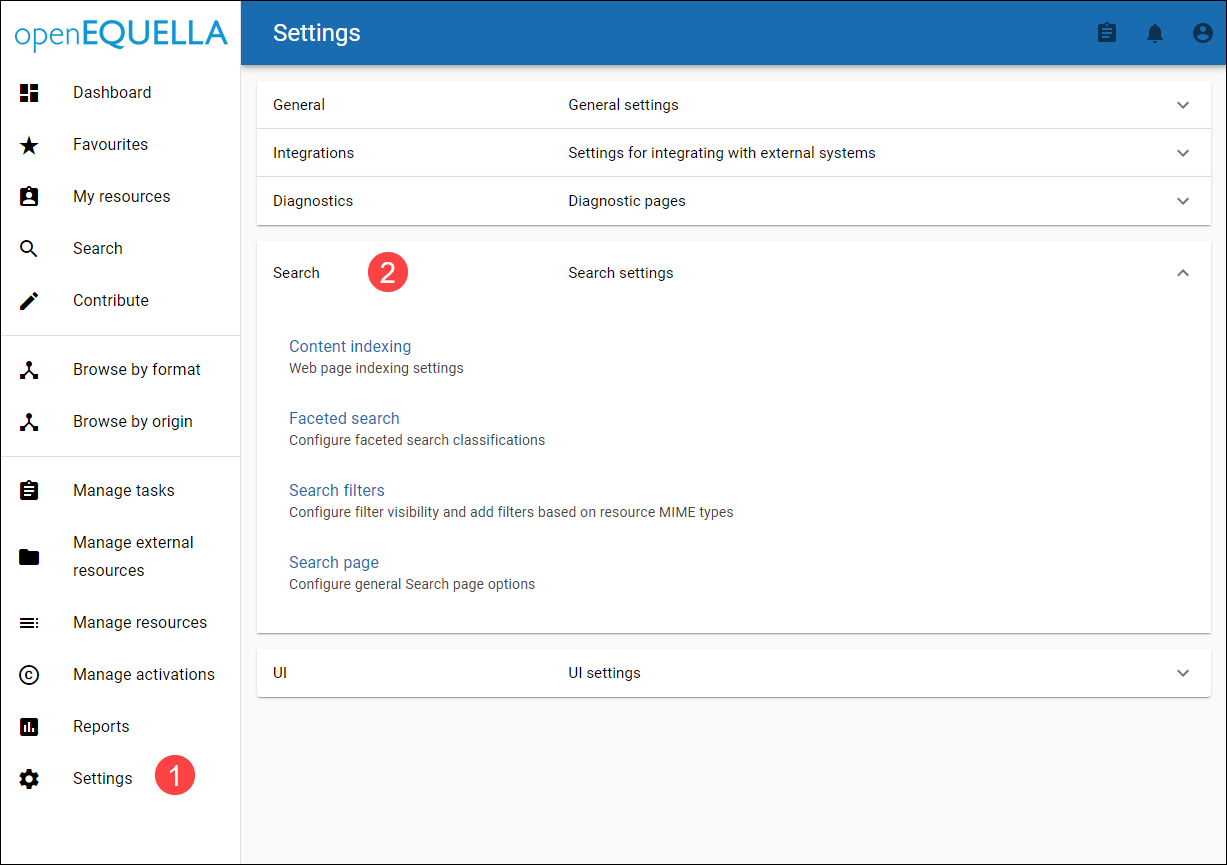
Figure 4 Settings - Search category
Content indexing
Content indexing contains the existing settings for web-page content indexing and search term boosting.
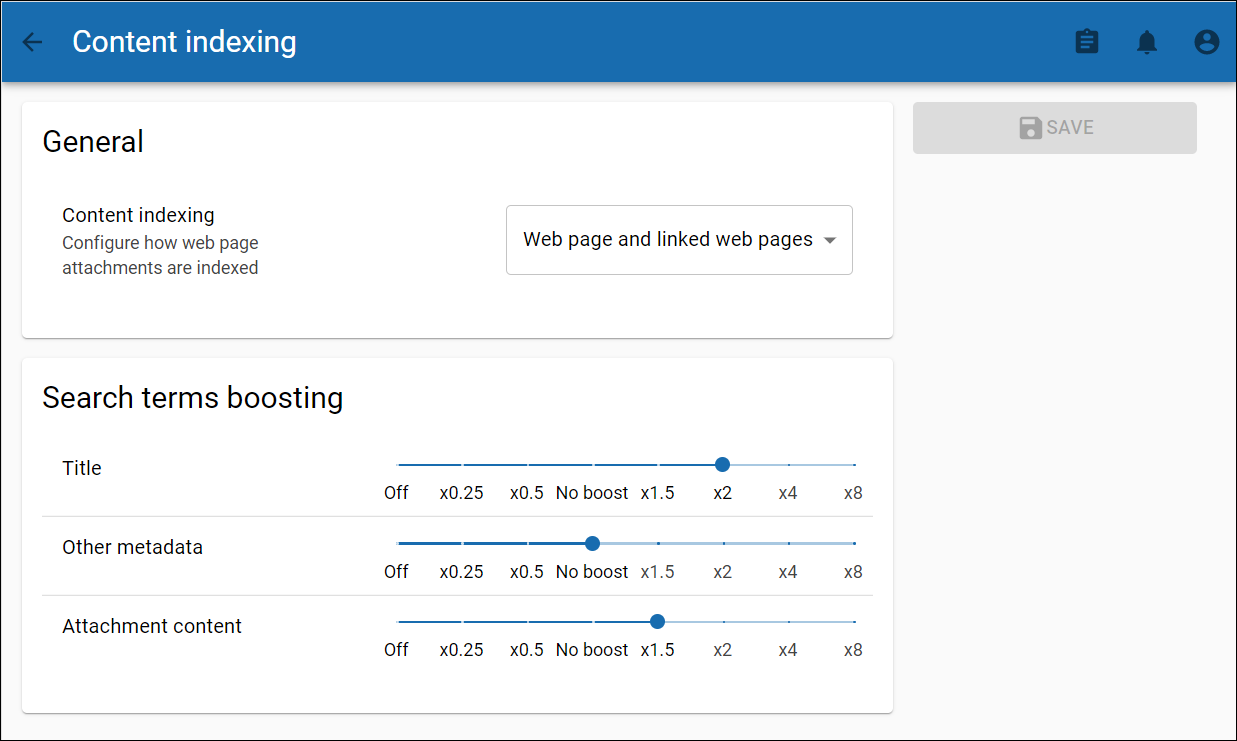
Figure 5 Content indexing and Search terms boosting
Faceted search
Use the Faceted search settings to add, edit and delete Faceted search Classifications based on a metadata schema node (Classification) and its values (Categories). Configured Classifications display in the Refine search panel on the Search page, and users can refine their searches by selecting specific Classification Categories.
An example of a Faceted search Classification and its Categories in the Refine search panel is shown below.
Classifications
Classifications are configured, edited and deleted from the Faceted search setting page. Multiple classifications can be configured. Note the following:
-
Only relevant classifications display on the Search page based on filters selected, such as Collections. For example, if a search is filtered with a collection that doesn’t use the schema and node selected for a Classification, that Classification will not display in the Refine search panel.
-
Classifications show only categories that contain results for the defined search criteria. The number of results show for each category.
-
Classifications and their categories will update based on selections made by users. If a specific category is selected in one Classification, other Classifications and their categories will immediately adjust to reflect the selection.
-
When configuring Classifications, the default number of categories to display can be defined. If more categories exist, a ‘SHOW MORE’ option displays at the bottom of the list. Once expanded, a ‘SHOW LESS’ option displays. An example is shown in Figure 6.
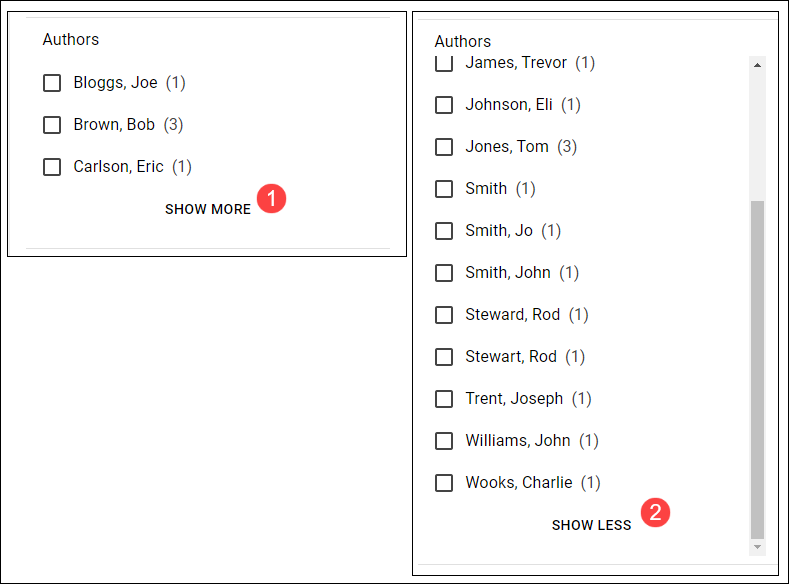
Figure 6 Classification with default and expanded views
To configure a Classification
-
From the Settings, Search category, select Faceted search. The Faceted search settings page displays. An example is shown in Figure 7.
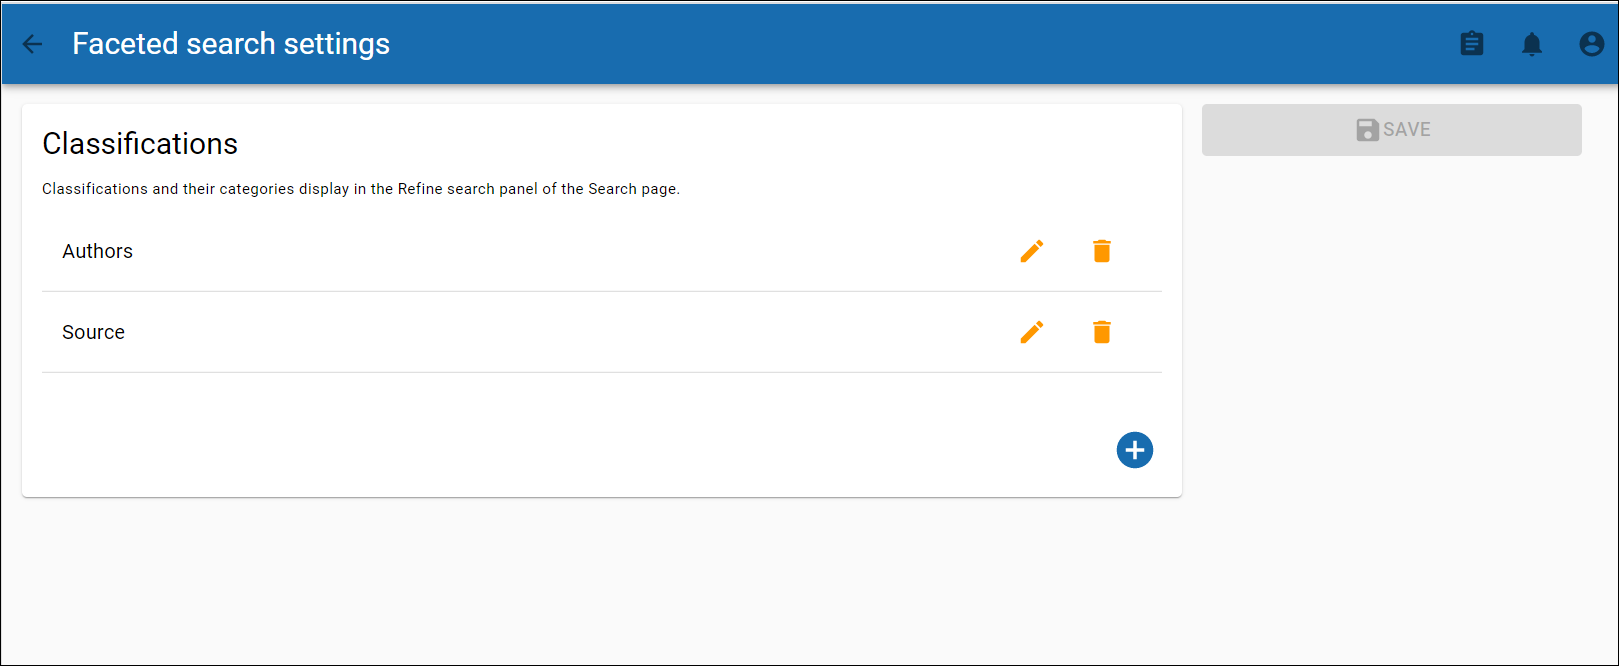
Figure 7 Faceted search settings page
-
Select the Add button (or the pencil icon to edit an existing Classification). The Create classification dialog displays. An example is shown in Figure 8.
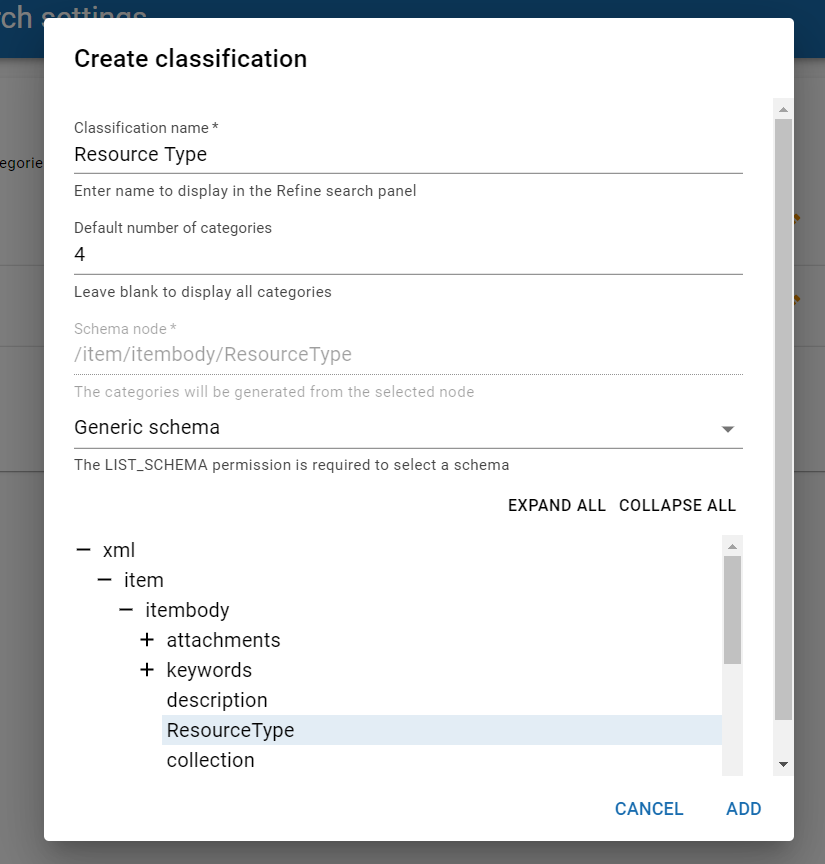
Figure 8 Create classification with example classification
-
Enter a Classification name. This displays as the Classification title in the Refine search panel.
-
Enter the Default number of categories to display in the Refine search panel. A SHOW MORE link displays if there are a greater number of categories with results. Leave this field blank to display all categories with results.
-
Select a Schema node:
a. Select a schema from the drop-down list. Note that the user must have the LIST_SCHEMA privilege granted for schemas to display in the list.
b. Navigate to and select the required schema node by either expanding the tree manually or using the EXPAND ALL option.
NOTE: The selected schema node must have Index for Advanced Searches enabled in the schema.c. Select ADD.
-
Click SAVE. The Classification now displays in the Refine search panel on the Search page. An example is shown in Figure 9.
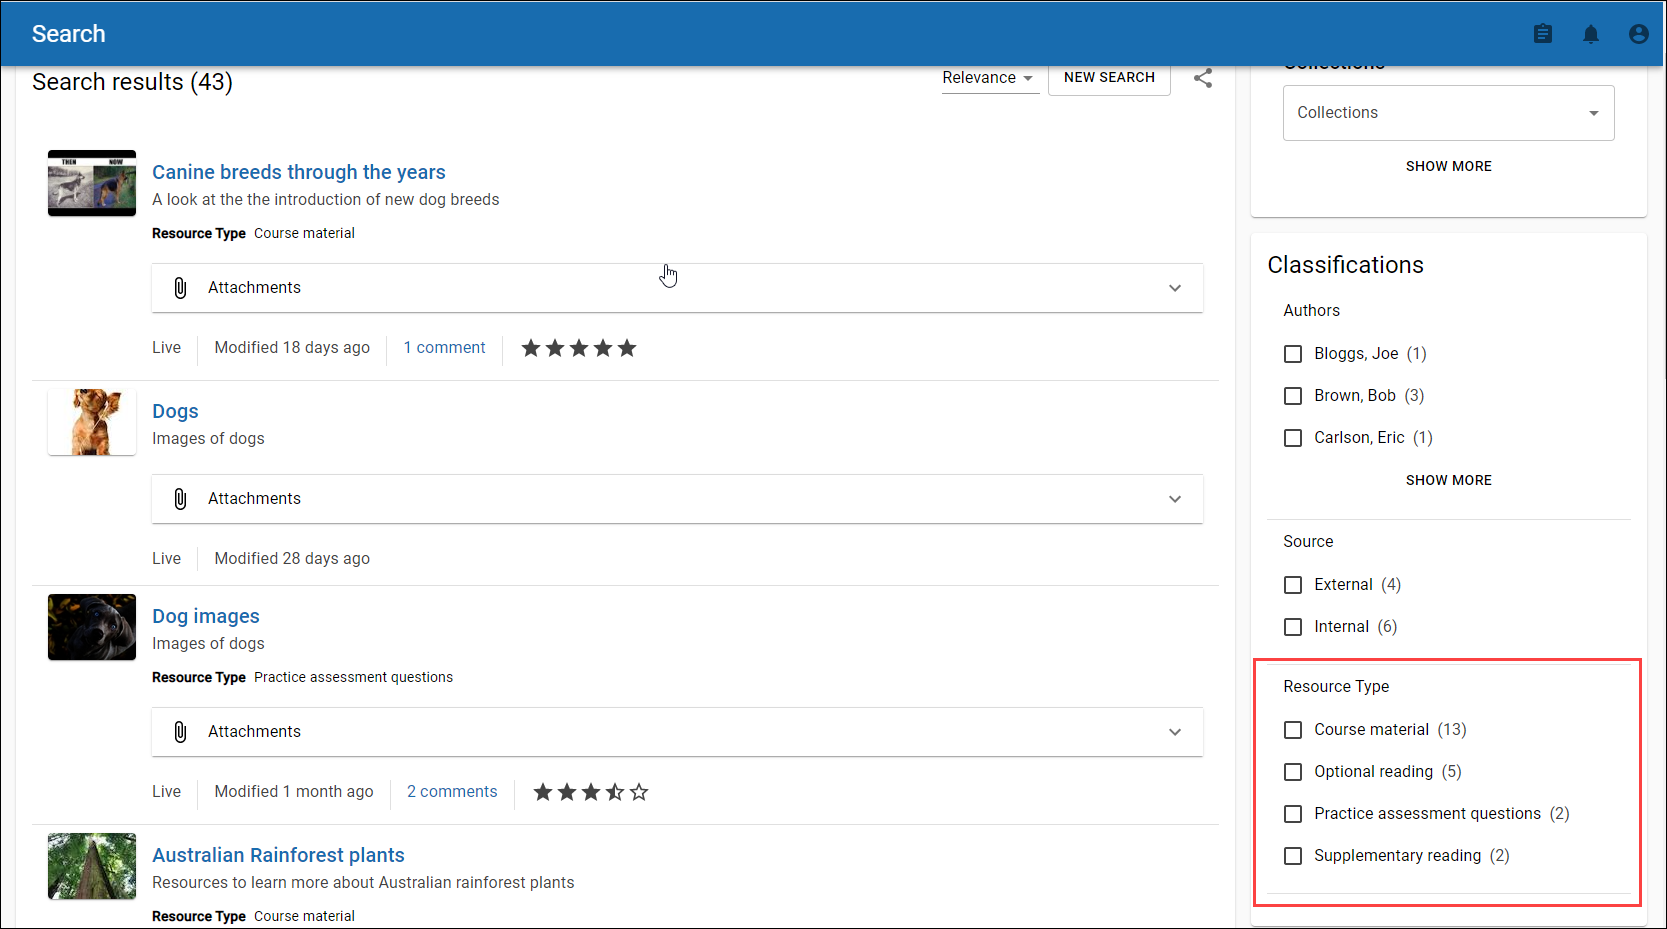
Figure 9 Search page with new Classification
Reordering classifications
The order in which classifications display in the Classification panel on the Search page can be changed.
To reorder classifications
-
From the Settings, Search category, select Faceted search. The Faceted search settings page displays listing existing Classifications. An example is shown in Figure 10.
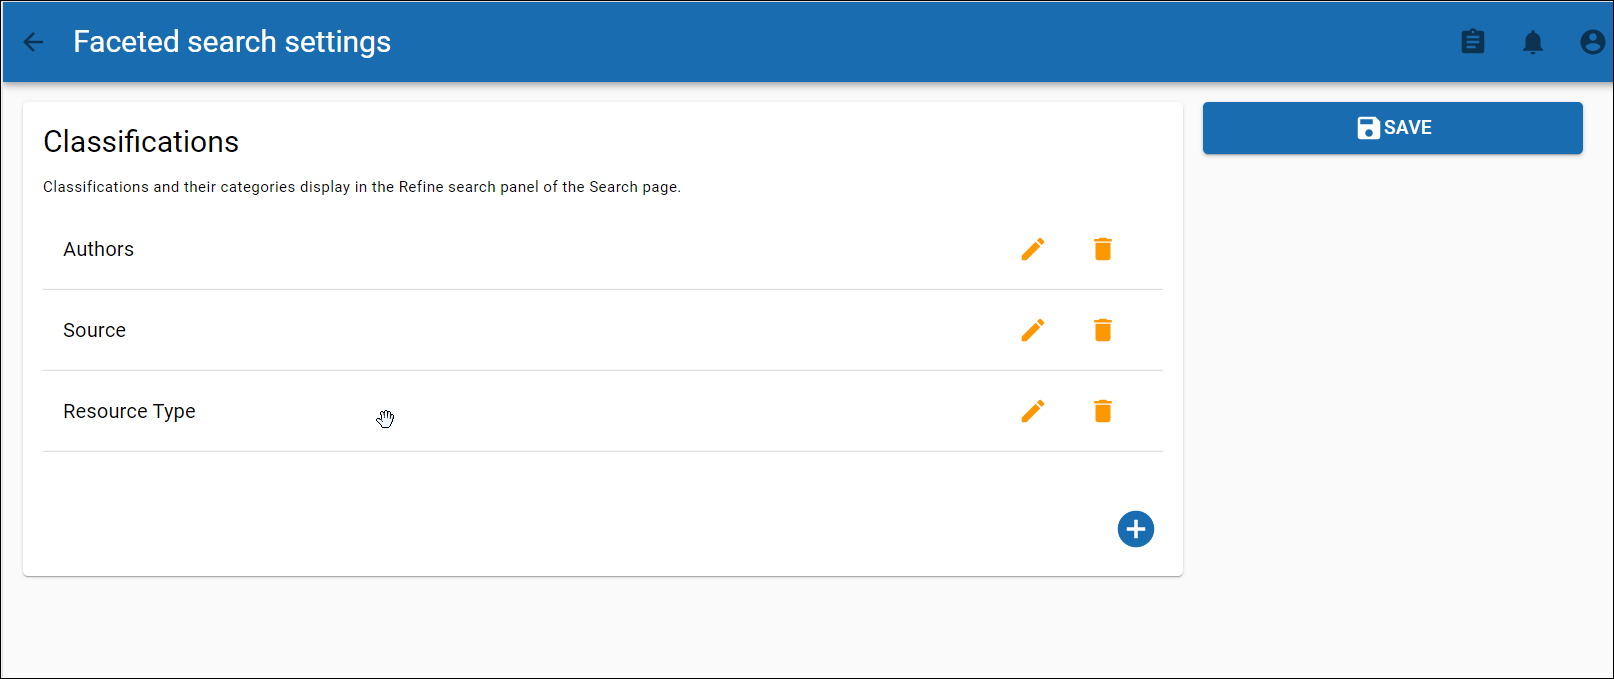
Figure 10 Faceted search settings page
-
Use drag and drop to organise existing Classifications into the desired display order.
-
Click SAVE. The Classifications display in the defined order in the Classifications panel on the Search page.
Search filters
The Search filters settings page contains new filter visibility options as well as the legacy Attachment MIME type filters configuration. An example is shown in Figure 11.

Figure 11 Search filter settings page
Filter visibility options
The new Filter visibility options allow administrators to hide the Owner and Date modified filters from the Refine search panel if required. These filters show by default on the Search page. An example is shown in Figure 12.
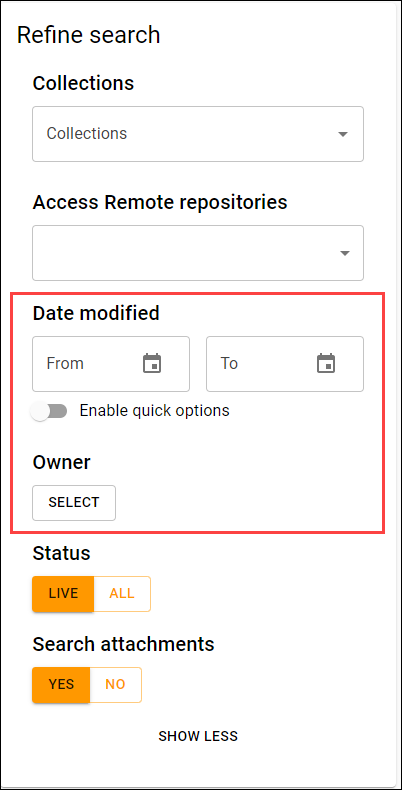
Figure 12 Refine search panel with Owner and Date modified filters visible
Click on the switch beside the required visibility setting to toggle the switch to on. When selected, the filter will not display in the Refine search panel. An example with the Owner filter disabled is shown in Figure 13.
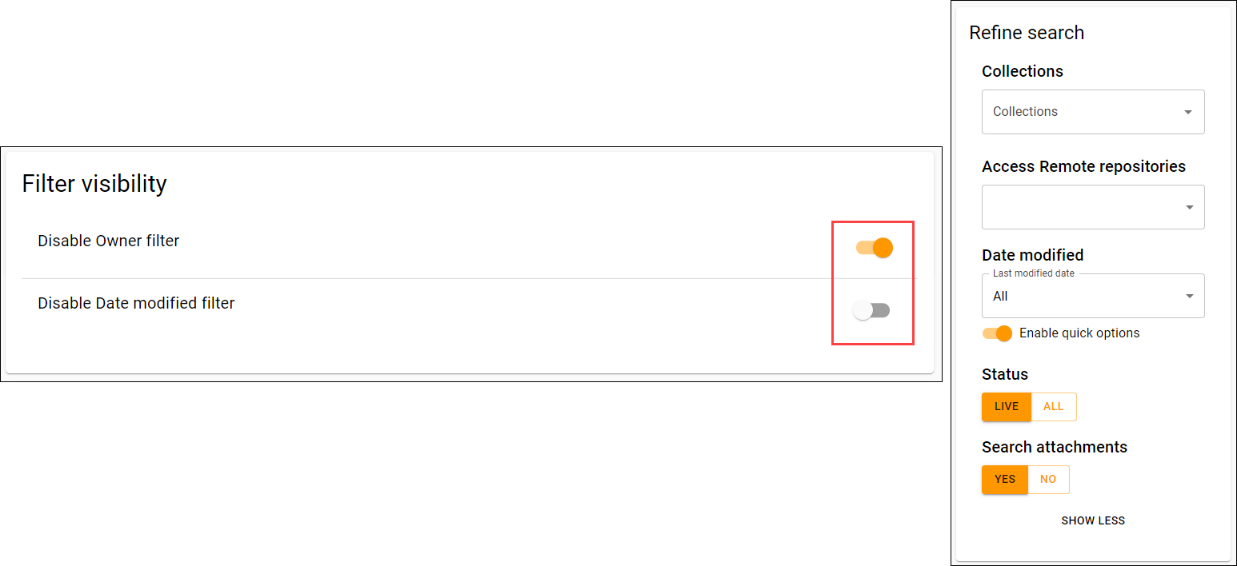
Figure 13 Refine search panel with Owner filter disabled
Attachment MIME type filter
NOTE: Attachment MIME type filters are not included in the new Search UI for 2020.2. They will be added to the Refine search panel in 2021.1.
Attachment MIME type filter configuration has not changed for 2020.2.
Search page
The Search page settings contain the legacy General and Gallery settings that existed prior to 2020.2, but display in the new UI template. When you upgrade to 2020.2, your current configuration for these settings will persist.
NOTE: openEQUELLA 2020.2 new Search UI does not include Gallery views.
An example is shown in Figure 14.
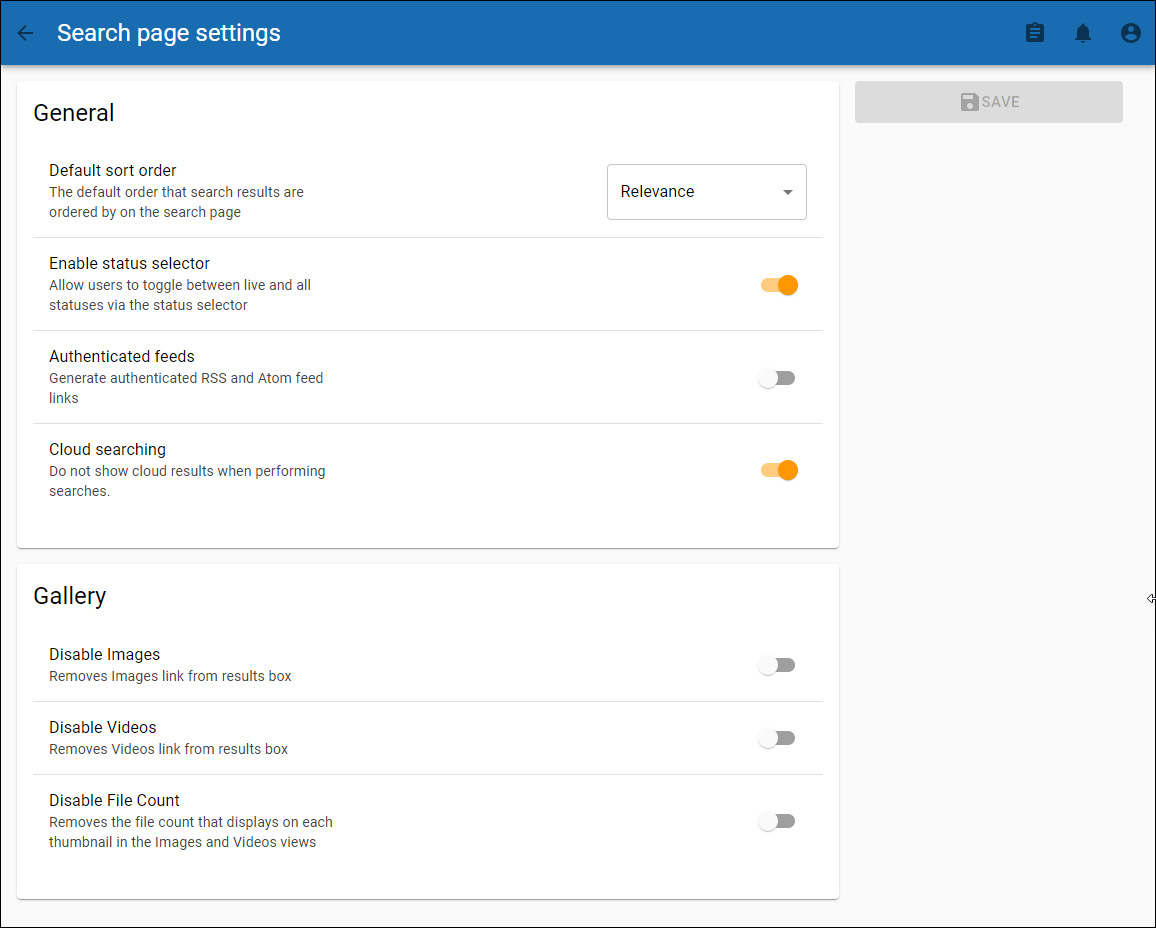
Figure 14 Search page settings
New UI Search page
openEQUELLA 2020.2 sees the introduction of a Material UI-based Search page featuring a modern, clean new look. It includes most of the existing functionality from the legacy Search UI, plus some new features. Any legacy UI features that are not included in this release, such as gallery views and saving and viewing favourite searches, will be implemented in openEQUELLA 2021.1.
An example of the new Search page is shown in Figure 15.
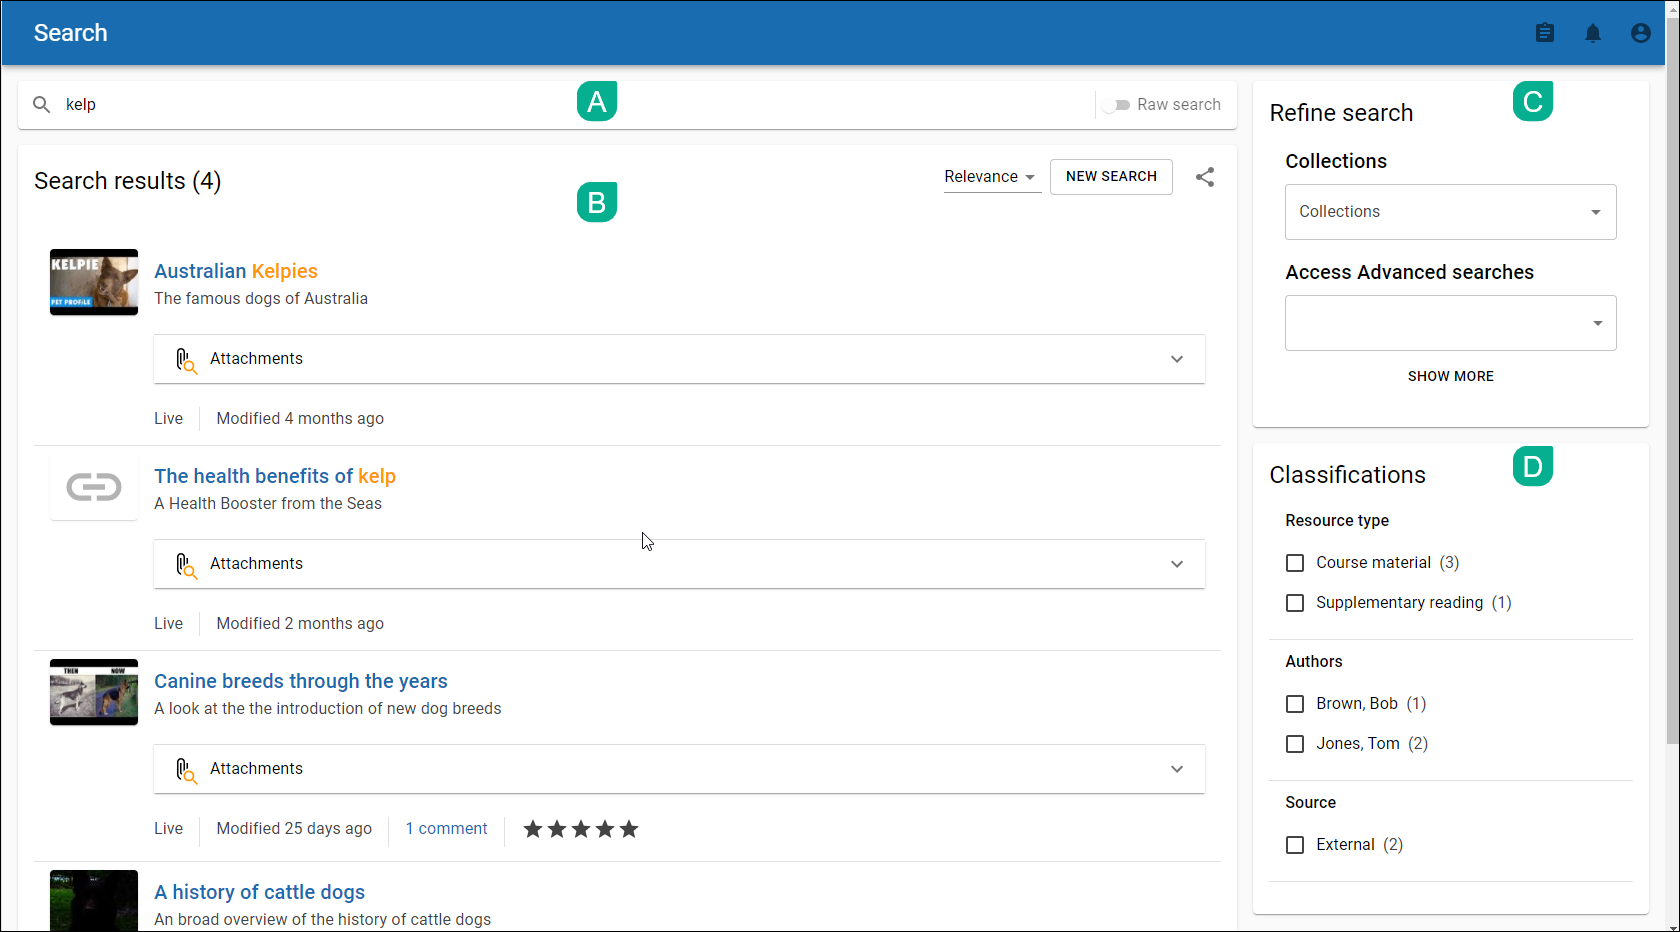
Figure 15 New UI Search page
To switch to the new Search page, go to Settings, UI and select Enable new search page.
NOTE: The new Search UI is not supported using legacy browsers such as IE11. It is designed to be used with modern browsers such as Chrome, FireFox, Edge and Safari.
The new Search page consists of four main panels:
A. Search query – enter search criteria such as key words to display matching results
B. Search results – displays results
C. Refine search – allows users to configure filters to refine search results
D. Classifications – displays faceted search categories to allow a concentrated level of refinement. This panel does not display if no faceted search classifications have been configured.
Search query panel
The Search query panel enables users to enter search terms.
By default, typed text is appended with a wildcard (*), so results are based on anything starting with the entered term. The example below shows a search term of ‘kelp’ has been typed, which the default search method effectively converts to ‘kelp*’ by default. An example is shown in Figure 16.
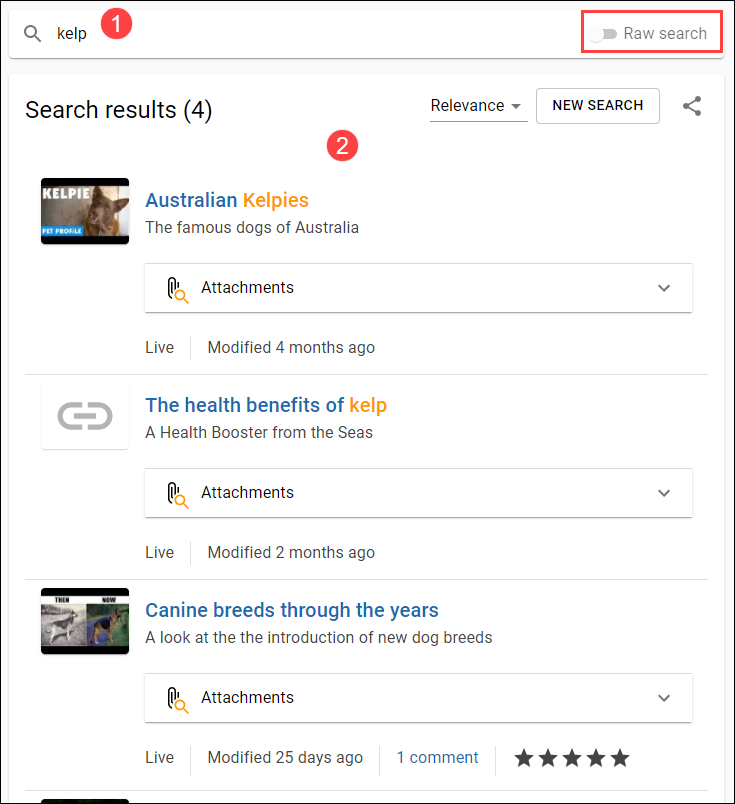
Figure 16 Default ‘wildcard’ search
Users can switch off the default wildcard search by selecting the Raw search option, which returns exact matches. Raw search also supports stemming and stop words. An example is shown in Figure 17.
Figure 17 Raw search
Both search types support the use of the Apache Lucene search syntax.
Search results panel
The Search results panel lists the items that match entered search criteria. All items are listed in the default Sort order selected in Search settings upon opening the Search page. If Relevance is selected as the default Sort order, items are displayed in Date last modified order until search criteria is entered.
The details for each item display in a similar fashion to the legacy UI, with some notable changes marked in the following example and explained below:
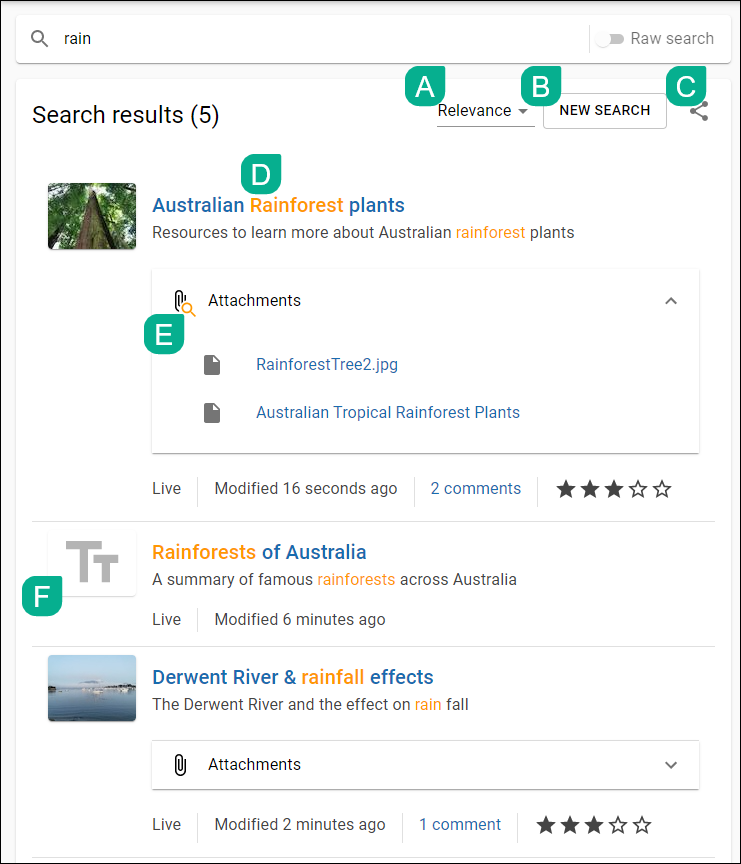
Figure 18 Results panel with notable changes
A. Sort order – can be easily accessed to change to another option in the drop-down list.
B. New search – this button clears all existing search criteria text and filters ready to start a new search
C. Share – copies the current search URL for the purpose of sharing. Any search criteria and filters existing at the time the Share button is selected will persist when the URL is used.
D. Keyword highlights – any words containing the typed search criteria are highlighted for each item.
E. Attachment results indicator – the magnifying glass icon displayed with the attachment icon indicates that matches with the entered search criteria have been found within the item’s attachments.
F. Thumbnails – the new Search UI displays the thumbnail of the first attachment in the attachment list for an item. If no thumbnail is available, a default MIME type thumbnail displays. If there are no attachments, the text thumbnail (as shown in the figure above) displays, denoting only metadata.
Refine search panel
The Refine search panel enables users to select various filter options to more efficiently discover the content they seek.
The Refine search panel defaults to showing the Collections and Advanced search filters, but selecting the SHOW MORE link displays further filtering options.
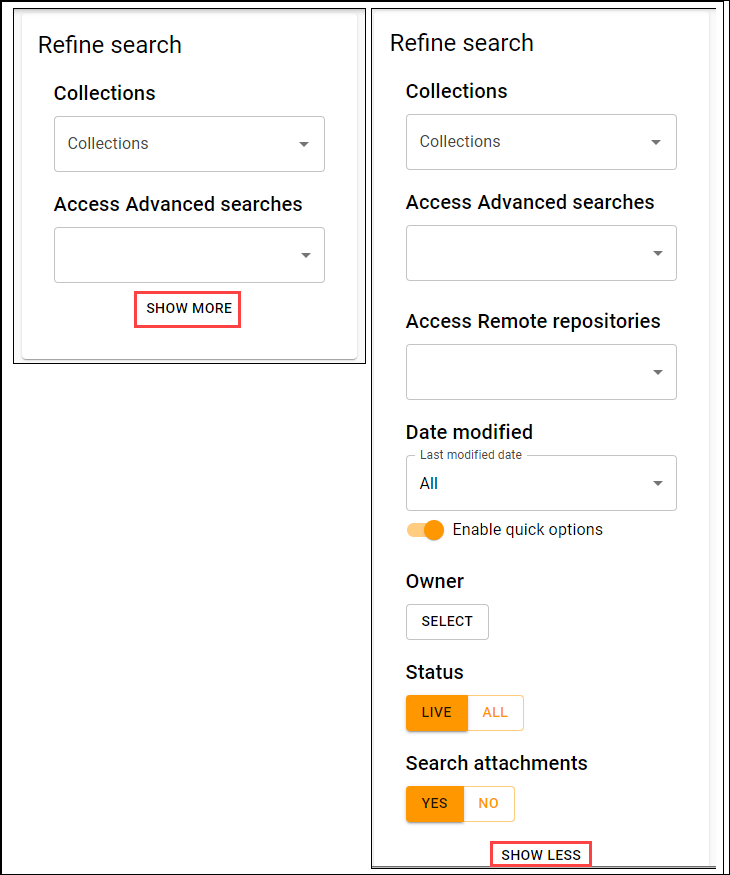
Figure 19 Refine search panel
Collections filter
Unlike the legacy UI, the new Search UI has a searchable multi-select collection filter. Collections can be discovered and selected by:
- Opening the drop-down and selecting one or more from the scrollable list. An example is shown in Figure 20.
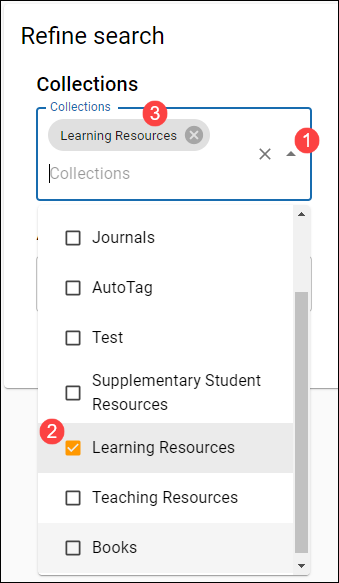
Figure 20 Collection drop-down
Or,
- enter part of a Collection name in the Collection box to view and select matching results. An example is shown in Figure 21.
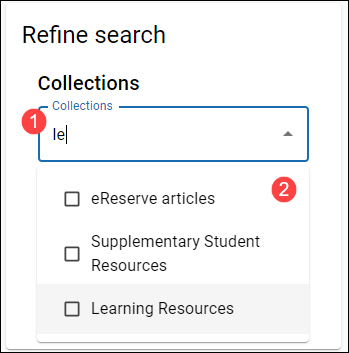
Figure 21 Search for collections
Selected Collections display in the Collections edit box. If there are more than two selected, +x displays, where x equals the number of additional collections selected, and the down arrow to the right can be used to expand the view. An example is shown in Figure 22.
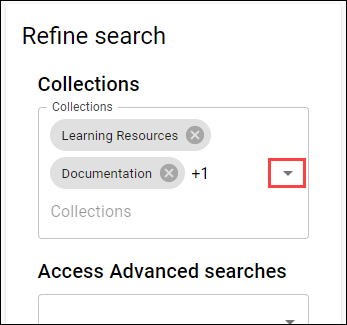
Figure 22 Collections filter with more than two collections selected
A selected collection can be cleared from the filter by clicking the X beside the collection name. To clear all selected collections, click the X to the right of the selected list. An example is shown in Figure 23.
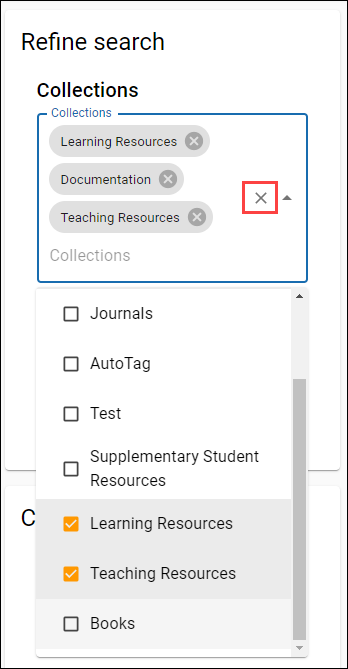
Figure 23 Clear all selected collections
Access Advanced searches
The Access Advanced searches control enables users to select an Advanced search from a list of Advanced searches they have access to. An example is shown in Figure 24.
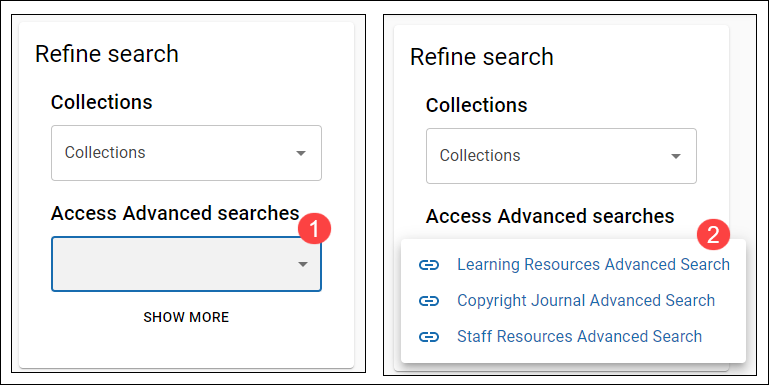
Figure 24 Access Advanced searches drop-down
NOTE: On selection of an Advanced search in openEQUELLA 2020.2, the user is taken to the selected Advanced search using the legacy Search UI page. Application of the new UI technologies to Advanced searches will be included in a future release.
An example is shown in Figure 25.
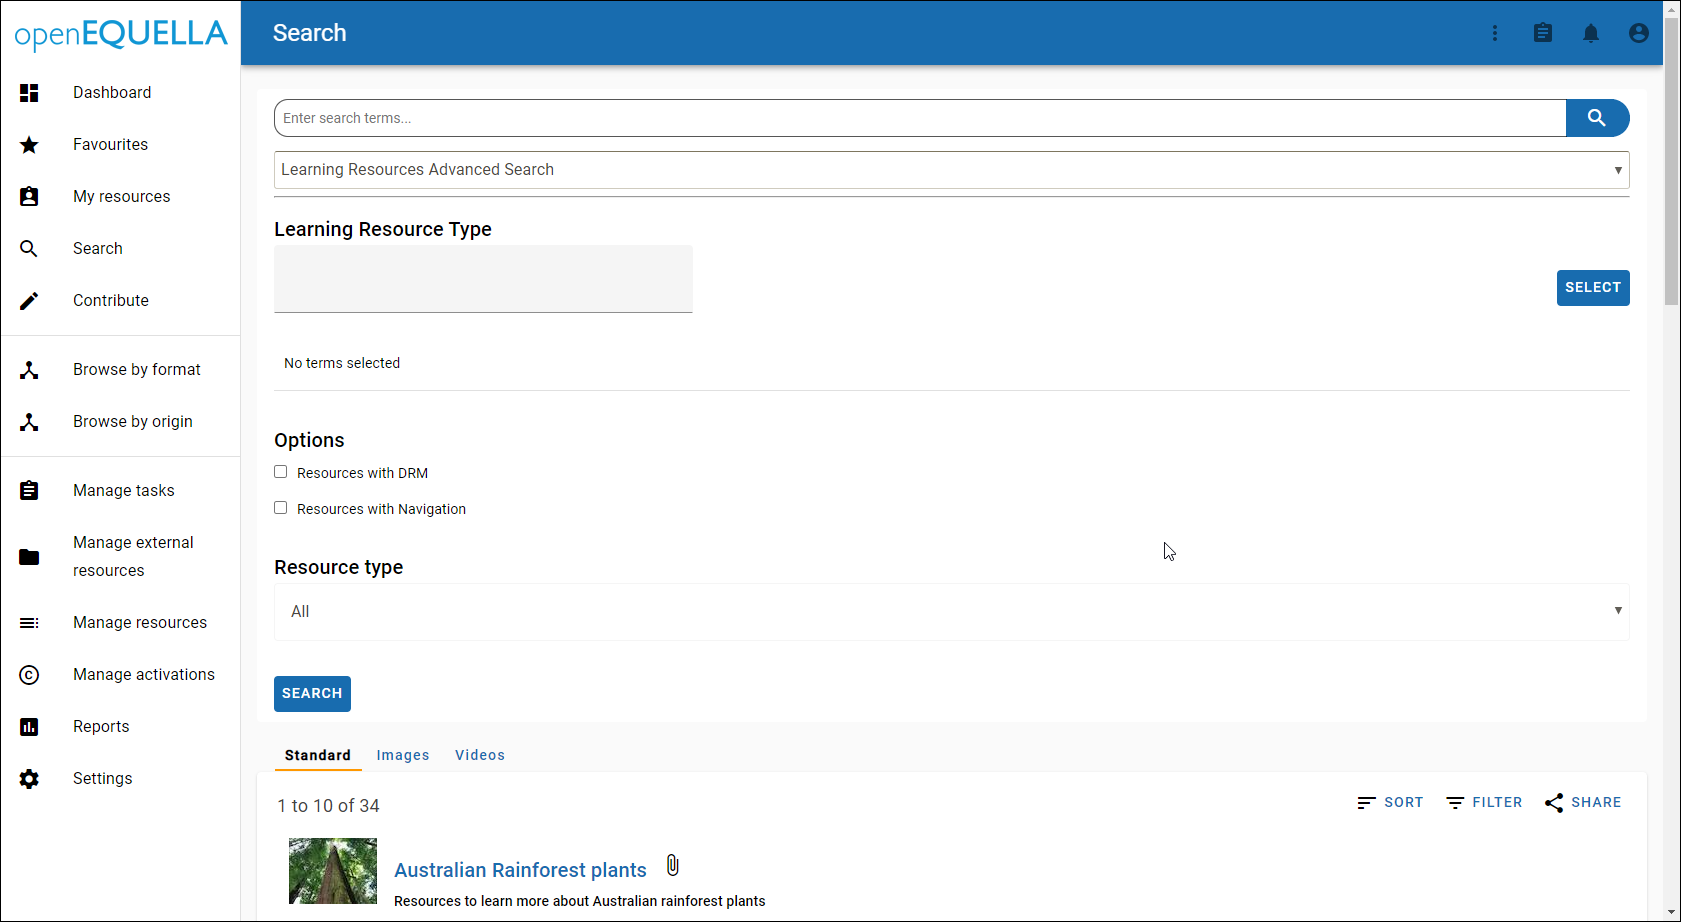
Figure 25 A selected Advanced search displayed in the old Search UI
Access Remote repositories
The Access Remote repositories control enables users to select a Remote repository from a list of Remote repositories they have access to. An example is shown in Figure 26.

Figure 26 Access Remote repositories drop-down
NOTE: On selection of a Remote repository in openEQUELLA 2020.2, the user is taken to the selected Advanced search using the legacy Search UI page. Application of the new UI technologies to Advanced searches will be included in a future release.
An example is shown in Figure 27.
Figure 27 A selected Remote repository search displayed in the old Search UI
Date modified filter
The Date modified filter defaults to All dates, and has been updated to include quick options as well as date ranges. The quick options are enabled by default, and allow users to select common values from the drop-down list to discover matching content. An example is shown in Figure 28.
NOTE: The Date modified filter can be disabled in Search settings. When disabled, this filter will not appear in the Refine search panel. See Filter visibility options.
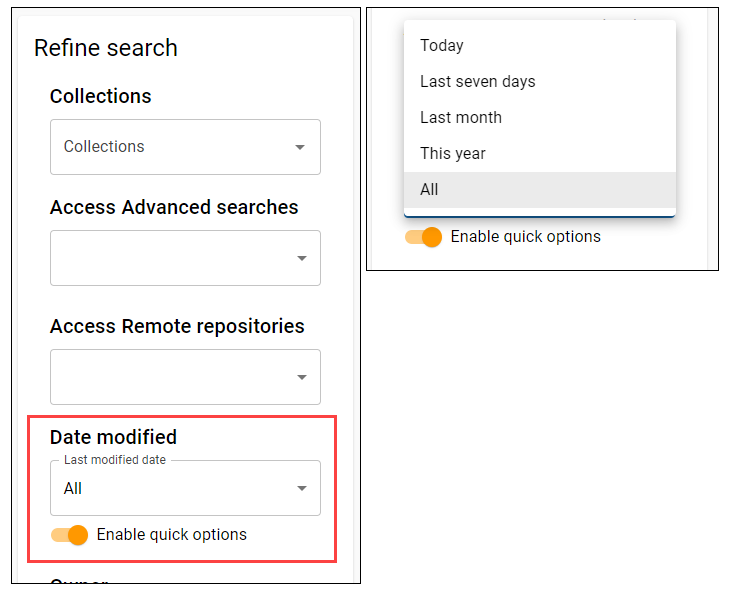
Figure 28 Date modified filter - quick options
The Enable quick options switch can be turned off, displaying date range fields. Clicking in the From or To fields displays a calendar selector. A date range can be selected or the From date only can be selected, which will return items that have been modified from the selected date until the current date. An example is shown in Figure 29.
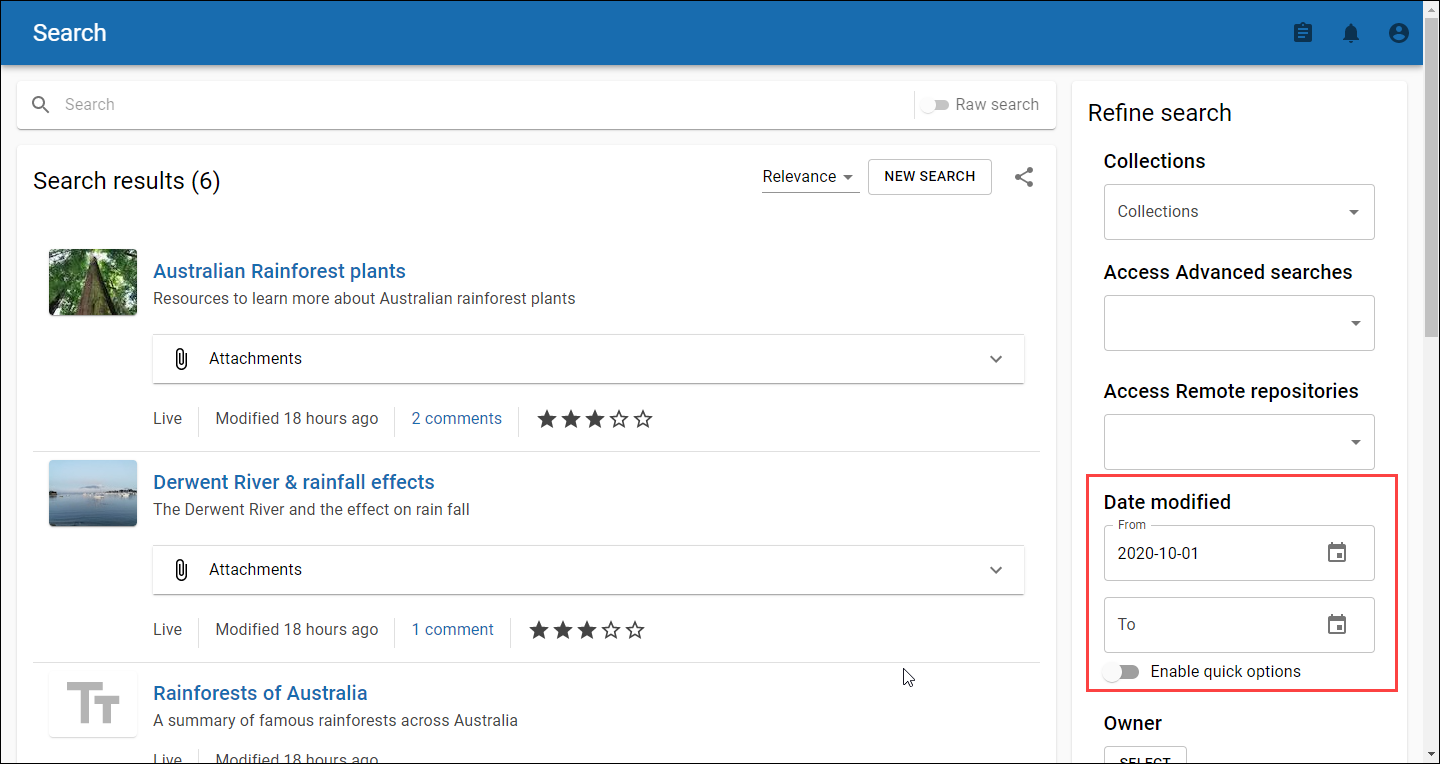
Figure 29 Date modified filter
Owner filter
The Owner filter has been updated with the new UI technology, but the functionality has not changed. Use the SELECT button to open the User selector and search and select the required Owner. An example is shown in Figure 30.
NOTE: The Owner filter can be disabled in Search settings. When disabled, this filter will not appear in the Refine search panel. See Filter visibility options.
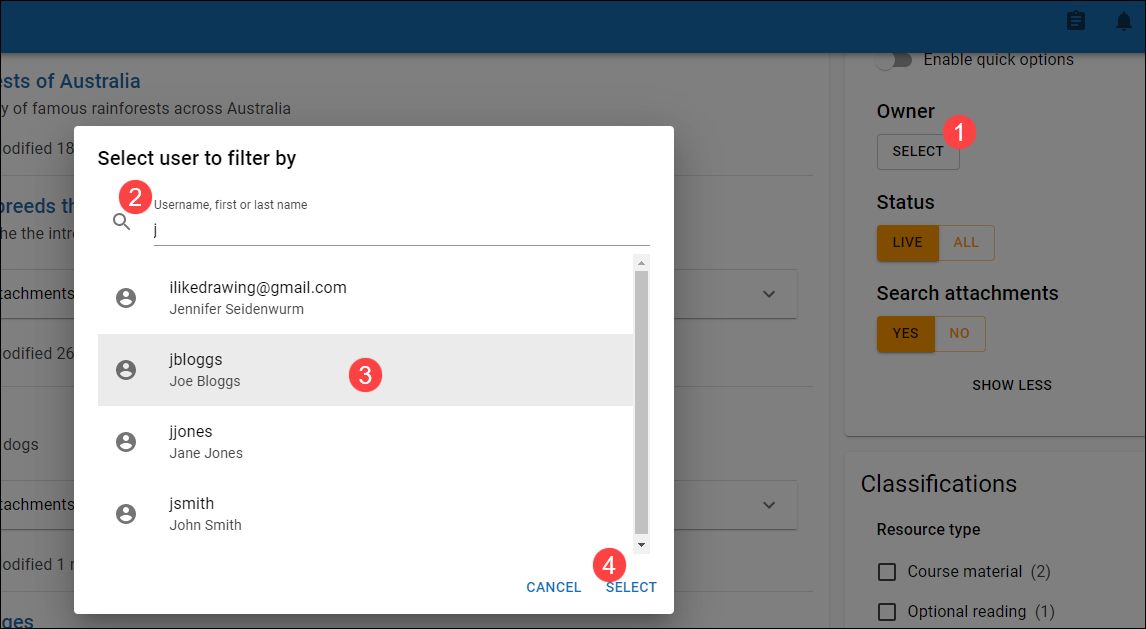
Figure 30 Owner selector
The selected Owner displays in the Owner filter, and can be cleared by clicking the Delete icon (rubbish bin). An example is shown in Figure 31.
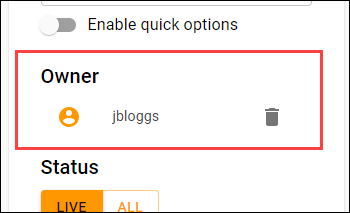
Figure 31 Owner filter with selection
Status
The Status filter displays if the Enable Status selector option (accessed from Settings, Search, Search page settings) is enabled. In the old UI, this option was accessed from the search Page options (Show items that are not live checkbox).
If ALL is selected, items with statuses other than Live (e.g. Deleted, Moderating etc.) will also display in the search results. An example is shown in Figure 32.
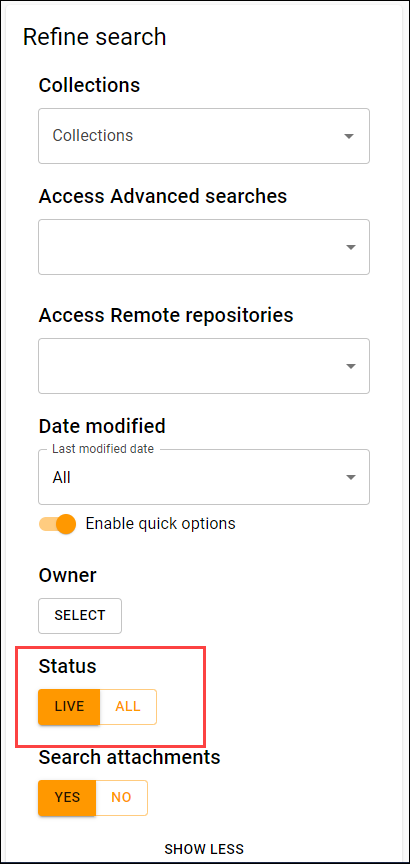
Figure 32 Status filter
Search attachments
The Search attachments filter allows users to toggle between searching in attachments and searching only item metadata (e.g. Name, Description etc.). In the old UI, this option was accessed from the search Page options (Search attachments checkbox). An example is shown in Figure 33.
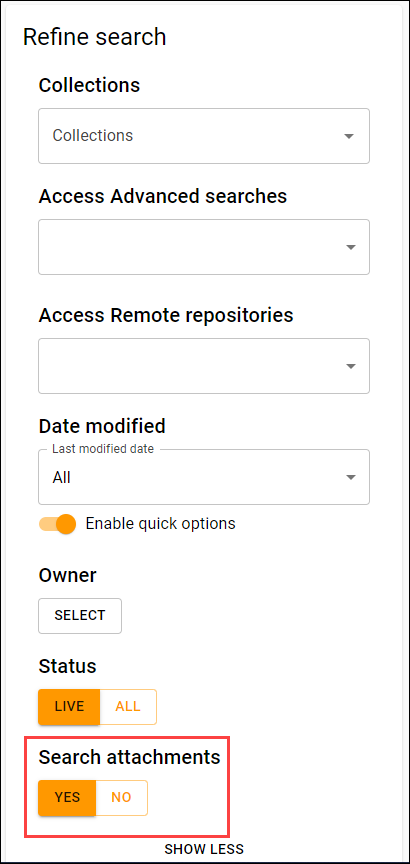
Figure 33 Search attachments filter
Classifications panel
The Classifications panel displays any Classifications and associated categories that have been configured and are relevant to the current search results, based on values stored in a specified schema metadata node. See Classifications for further configuration information.
NOTE: The Classifications panel does not display if there are no configured Classifications or if the search criteria eliminates the relevance of a configured Classification (e.g. selected Collection does not use the schema node selected for a Classification).
The Classification displays with its categories and the number of results found for each category. If there are no results found for categories, they do not display in the list.
If multiple Classifications have been configured, when one or more categories are selected in one Classification, the results of the others are recalculated and redisplayed based on those selections.
When a category is selected, it displays at the top of the category list to make it easy to see current selections from the list.
SHOW MORE and SHOW LESS links are used to view more or less categories for each Classification.
Examples are shown in Figure 34 and Figure 35.
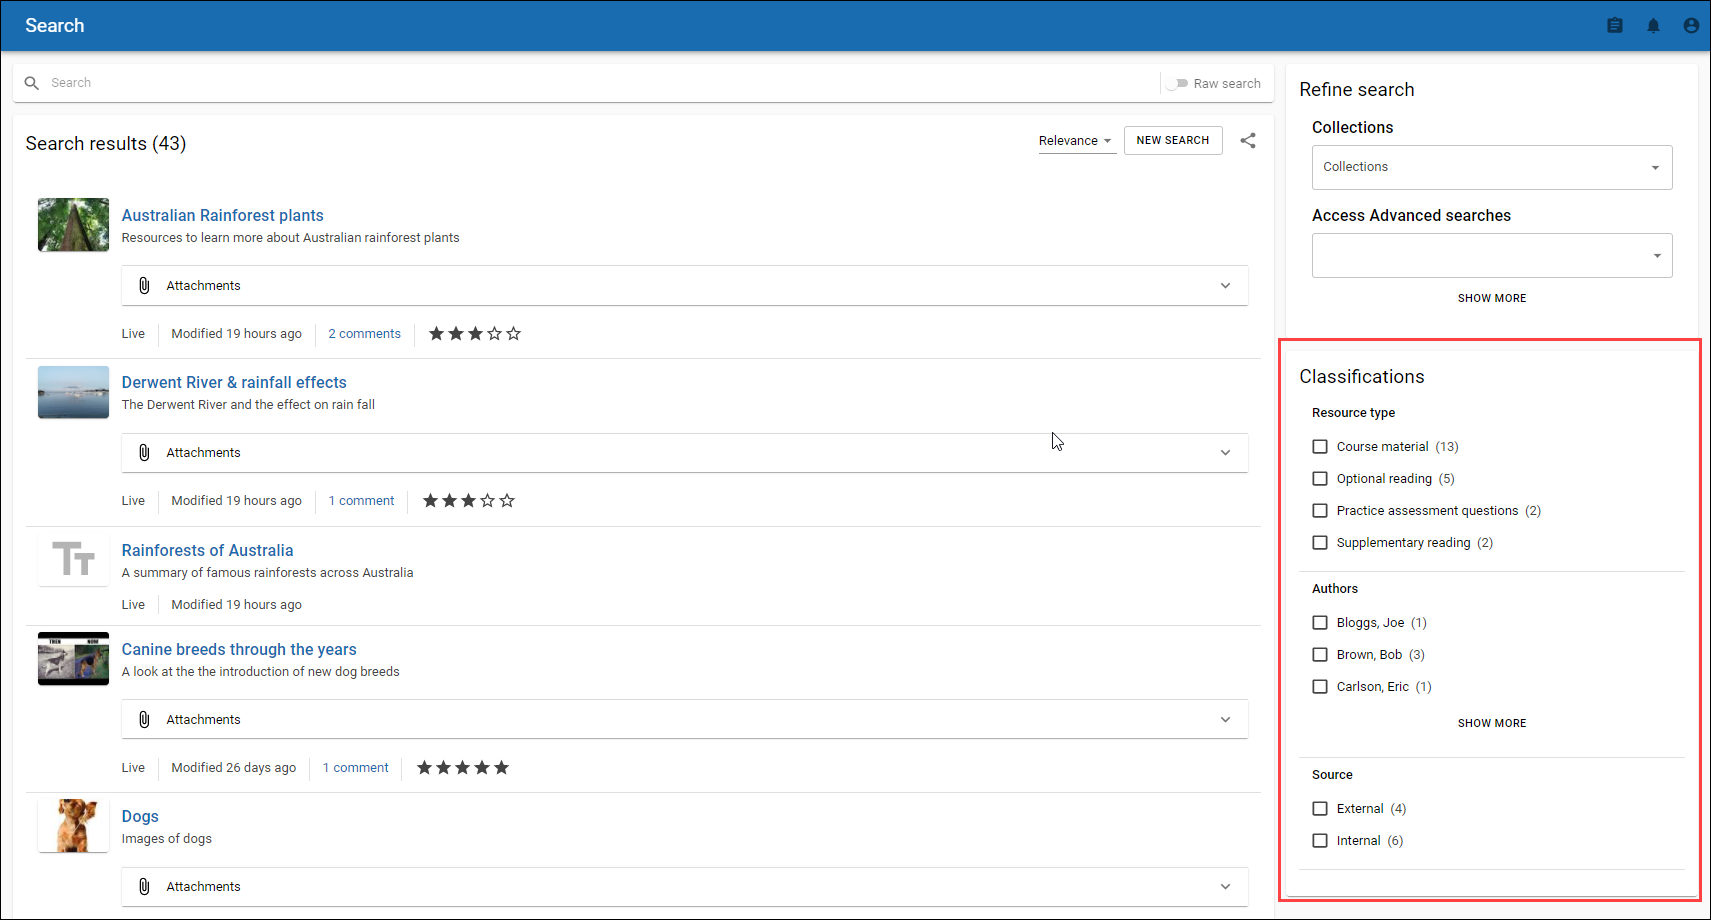
Figure 34 New Search UI Classifications panel
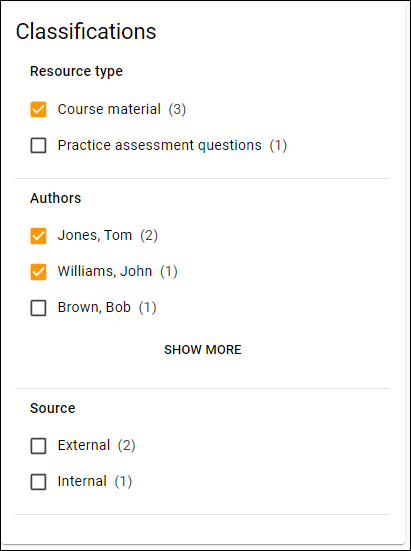
Figure 35 Classifications with selections
New UI Selection session
The new Search UI has been applied to the standard Search results page for Selection sessions accessed from an integrated LMS.
All the new search UI functionality outlined above applies to the Selection session page. The Select buttons look a little different but work in the same way as the legacy UI, as does drag and drop.
Note that when accessing other pages from the Selection session, such as Advanced and Remote repository searches and Contribution, My resources and Favourites pages, you will be taken to the legacy UI pages, which use the older style Select buttons. These pages will be updated with the new UI technologies in future releases.
An example of a Selection session opened from a Moodle course is shown in Figure 36.
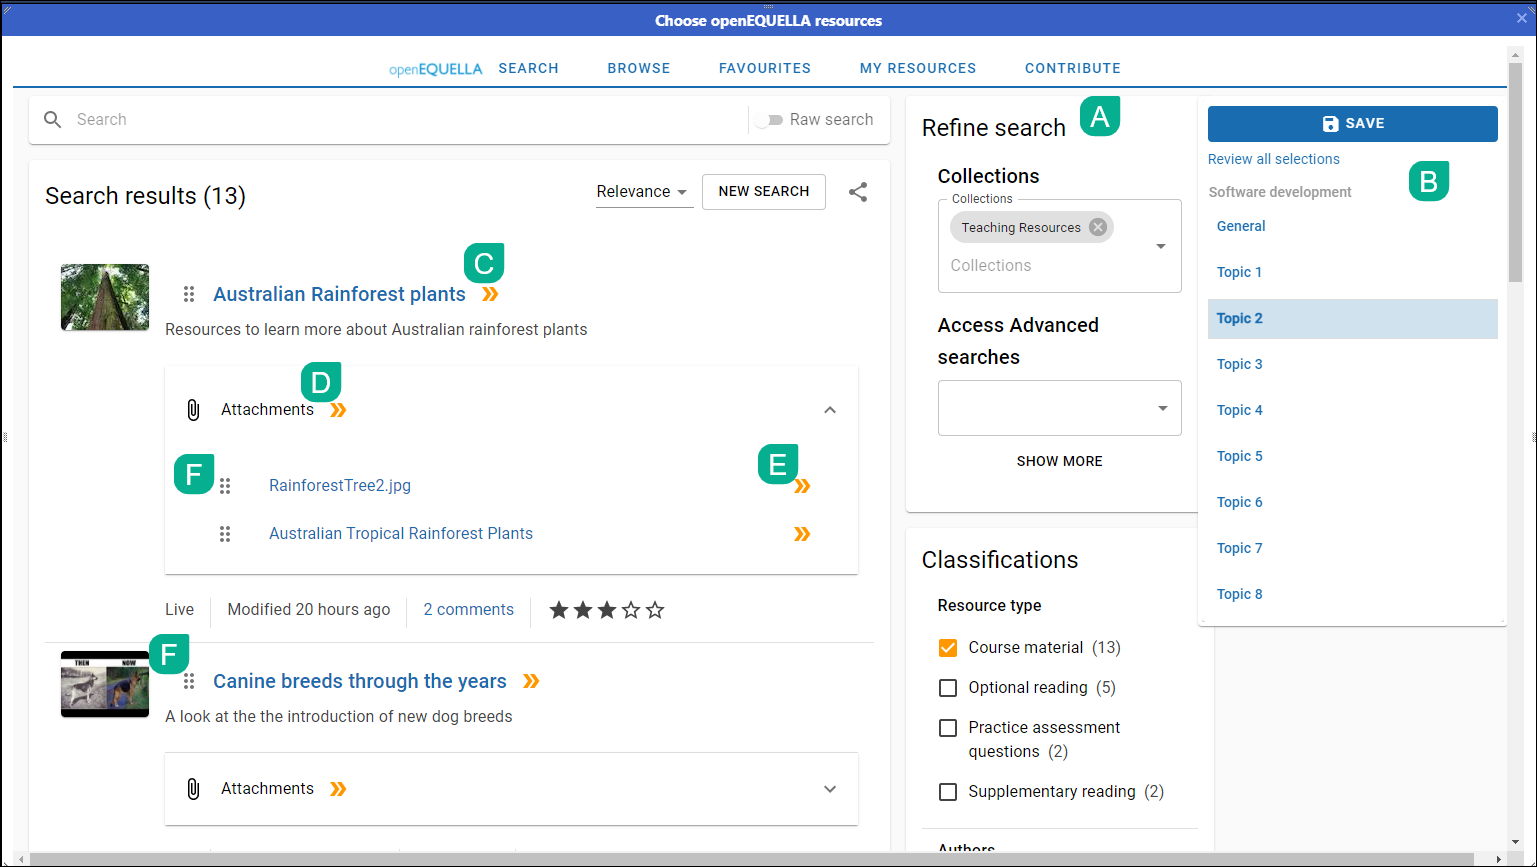
Figure 36 Example Moodle Selection session
A. Refine search panel – allows filtering and accessing of Advanced and Remote repository searches.
B. LMS panel – displays as it always has, and stays visible when scrolling.
C. Select summary page - use the select icon beside the item title to add the item summary page to the highlighted LMS course section.
D. Select all attachments – click the select icon beside the item’s Attachments label to add all attachments to the highlighted LMS course section.
E. Select attachment – click the select icon beside a specific attachment to add that attachment to the highlighted LMS course section.
F. Drag and drop handles- use these to drag and drop item summary pages or specific attachments to any LMS course section.
Remaining Search UI features planned for next release
-
Gallery views - Image and video views.
-
Add to favourites - the ability to add an item to your favourites from the list of search results. Can still do this from the Summary page.
-
Add search to favourites
-
Display of MIME type filters - MIME type filters will be added to the Refine search panel.
To view known issues for openEQUELLA, go to https://github.com/openequella/openEQUELLA/issues
Dependency upgrades
Major upgrades
-
Hibernate - see Spring and Hibernate upgrades
-
Hikari Connection Pool (version 3) - manages the pool of database connections, ensuring stable access to the database at a high level of performance
-
Tomcat (version 9) - provides the HTTP(S) implementation, as well as acts as a (java servlet) container to run openEQUELLA
-
Spring - see Spring and Hibernate upgrades
Minor upgrades
Ones of significant note:
-
Google GSON - a JSON parsing library. (Previous version was 9 years out of date.)
-
Mozilla Rhino - Javascript engine for executing server side (e.g. Save) scripts. (Previous version was eight years out of date.)
-
PostgreSQL JDBC Driver - used when running openEQUELLA against an PostgreSQL DB
There were also many others.
Spring and Hibernate upgrades
Spring and Hibernate were upgraded to the latest versions of their respective 5.x series. Both dependencies were years behind their current versions, and especially due to the core nature of the dependencies, were creating security and maintenance concerns. While these dependency upgrades are largely behind the scenes, some modifications to the configuration files are recommended.
The following configurations will be automatically added to the Hibernate.properties file during the upgrade. These configurations force Hibernate to provide consistent behavior with the previous versions of Hibernate used in openEQUELLA.
# Keeps the legacy generator in place.
hibernate.id.new_generator_mappings=false
# Due to @Inheritance(strategy = InheritanceType.JOINED)
hibernate.query.omit_join_of_superclass_tables=false
Likewise, the following configurations will be added to the learningedge-config.properties file. Certain legacy configurations and usages of Hibernate are now logged as warnings. These are known tech-debt issues, so the recommendation is to leave these filters in place, especially in Production environments.
# Chatty deprecation warning suppression.
log4j.appender.FILE.filter.1=org.apache.log4j.varia.StringMatchFilter
log4j.appender.FILE.filter.1.StringToMatch=HHH90000022
log4j.appender.FILE.filter.1.AcceptOnMatch=false

log4j.appender.FILE.filter.2=org.apache.log4j.varia.StringMatchFilter
log4j.appender.FILE.filter.2.StringToMatch=HHH90000014
log4j.appender.FILE.filter.2.AcceptOnMatch=false
Adopters running openEQUELLA on Oracle may notice a slower startup / migration. This can be resolved by running the Oracle command found in the comment here.
Blackboard LTI And REST Enhancements
The integration between openEQUELLA and Blackboard has been enhanced to support a subset of functionality of the ‘Push to LMS’ features, and an enhanced LTI selection session flow.
These changes stem from the deprecation of the openEQUELLA building block and web service integration flows, and a phased effort to replace the deprecated functionality with modern technologies. It is highly recommended to migrate from the building block and web service flows to the LTI and REST flows.
To migrate your building block links, a migration building block has been developed and can be reviewed here.
The openEQUELLA ‘Push to LMS’ features for the Blackboard integration, allow users in openEQUELLA to access the Blackboard REST API, enabling a variety of openEQUELLA functions:
- Add to External System
- Find Uses
- Manage External Resources
- BIRT Reporting on External Connectors
- Course folders in selection sessions
For this release, the Add to External System and Course folders in selection sessions functions have been implemented. The rest of the functions above can be implemented in future releases.
Add to External System allows a user in openEQUELLA, from an item summary page, to ‘push’ content (summary page and/or attachments) as LTI links, into Blackboard courses / folders.
Course folders in selection sessions enables the LTI integration to be configured to display the course’s folder structure on the right hand side of the selection session. This enables multiple selections to be specificed in several course folders inside the same selection session.
Details on how to configure the openEQUELLA / Blackboard LTI (include the course folder structure) and REST (Push to LMS) can be found here.