openEQUELLA 2019.1 Features Guide
Table of Contents
- Administration Console Package
- Login Notice Editor
- Support for Languages other than English
- REST API Enhancements
- Cloud Providers
- Enhanced Blackboard Integration
Administration Console Package
In openEQUELLA versions prior to 2019.1, the Administration Console was launched from the openEQUELLA Settings page using Java Web Start. As time progresses, there are an increasing number of organisations who would prefer not to have Java installed on the client side as part of the Standard Operating Environment (SOE).
Until the Administration Console functionality can be transferred to the web, an interim solution in the form of an Administration Console ‘package’ is available to use with openEQUELLA 2019.1 and future releases. This package bundles the Java Runtime Environment (JRE) with the Administration Console and allows users to access the Administration Console on local systems. This will remove the requirement to install Java locally and this package will be the access point to the Administration Console from openEQUELLA 2019.1 forward.
Downloading the package
There are three Administration Console Packages available on GitHub, one each for Windows, Mac, and Linux operating systems.
To download the package
-
Go to https://github.com/apereo/openEQUELLA-admin-console-package/releases and download the latest package for your operating system.
-
Extract the package files to your preferred location on your local drive.
Opening the Launcher
The Launcher enables the configuration of openEQUELLA servers and the launching of their respective Administration Consoles, as well as various other functions.
To open the Launcher, double-click the relevant launcher file
(Windows-launcher.bat, Mac-launcher.sh, or Linux-launcher.sh). You may wish
to create a shortcut for this file as you will use it each time to access an
Administration Console. The openEQUELLA Administration Console Launcher
displays. An example is shown in Figure 1.
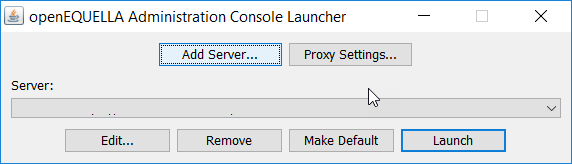
Figure 1 openEQUELLA Administration Console Launcher
openEQUELLA Administration Console Launcher components
The openEQUELLA Administration Console Launcher has the following functions:
-
Add Server – enables the openEQUELLA servers and their institutions to be configured so that their Administration Consoles can be launched. See Adding servers.
-
Proxy Settings – enables the details of a Proxy Host to be configured to allow access to the Administration Console.
-
Server – a drop-down list of configured openEQUELLA servers and their institutions.
-
Edit – enables the details of the currently selected Server to be modified.
-
Remove – removes the currently selected Server.
-
Make Default – click to make the currently selected Server display as the default when the Launcher app is opened.
-
Launch – launches the Administration Console for the selected Server.
Adding servers
Once the package is installed, each openEQUELLA server and institution must be configured to access their respective Administration Consoles. For example, if your organisation has a production environment and a test environment and you have access to the Administration Console for both instances, you are required to add both servers. Additionally, if there are multiple institutions on each server, a server record must be added for each institution.
To add a server
-
Open the Launcher using the relevant launcher file (
Windows-launcher.bat,Mac-launcher.sh, orLinux-launcher.sh). -
Select Add Server. The Server Editor dialog displays, as shown in Figure 2.
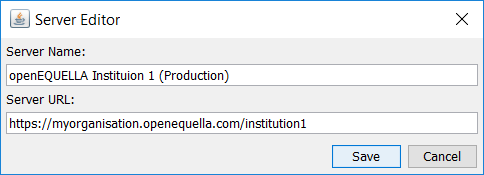
Figure 2 Server Editor
-
Enter a Server Name - a descriptive name for the openEQUELLA institution.
-
Enter the Server URL - the full openEQUELLA domain, including the institution name. For example,
https://myorganisation.openequella.com/institution1. -
Click Save.
Cloning servers
Once one server has been configured, on selection of the Add Server button, the user is presented with the option to clone the currently selected server. Selecting Yes to this option will prefill the Server Name and Server URL fields with the currently selected server details, and the user can adjust them to the required values.
Selecting No to this option will leave the Server Name and Server URL fields blank.
Launching the package
Once a server record has been added for an institution, the Administration Console for that institution can be opened.
To launch the Administration Console
-
From the openEQUELLA Administration Console Launcher, select the required Server.
-
Select Launch to open the Admin Console for the selected server/institution. An example is shown in Figure 3.
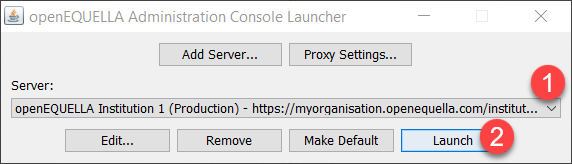
Figure 3 Launch the Admin Console
The Enter login credentials dialog displays. An example is shown in Figure 4.
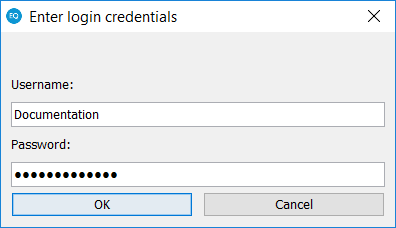
Figure 4 Enter login credential dialog
-
Enter your login credentials
NOTE: Login credentials will be requested each time an Administration Console is launched.
The Administration Console for the selected Server/Institution opens.
Login Notice Editor
openEQUELLA 2019.1 introduces the ability to create and display a notice on the Login page. This feature enables administrators to create content to display on the notice using a rich text editor (TinyMCE 5.0.2), including images, links, embedded videos, and more; as well as being able to schedule the notice to display within configured date and time parameters.
Please note that the Login page notice is in addition to the existing functionality which allows a simple text message to display in a popup after a user has logged in. This functionality has not changed, however access to the configuration setting for this function has been incorporated with the new functionality into the one Login notice editor setting.
An example of the new Before login notice is shown in Figure 5 and the existing After login notice is shown in Figure 6.
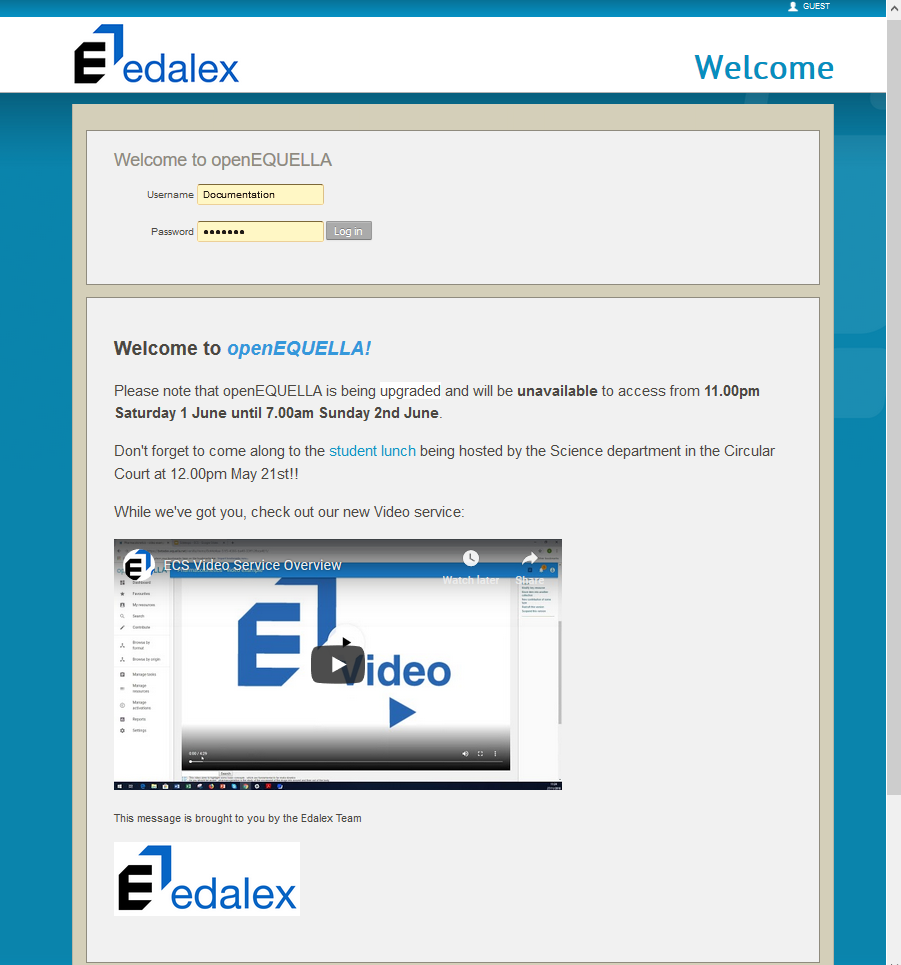 Figure 5 New ‘Before login’ notice
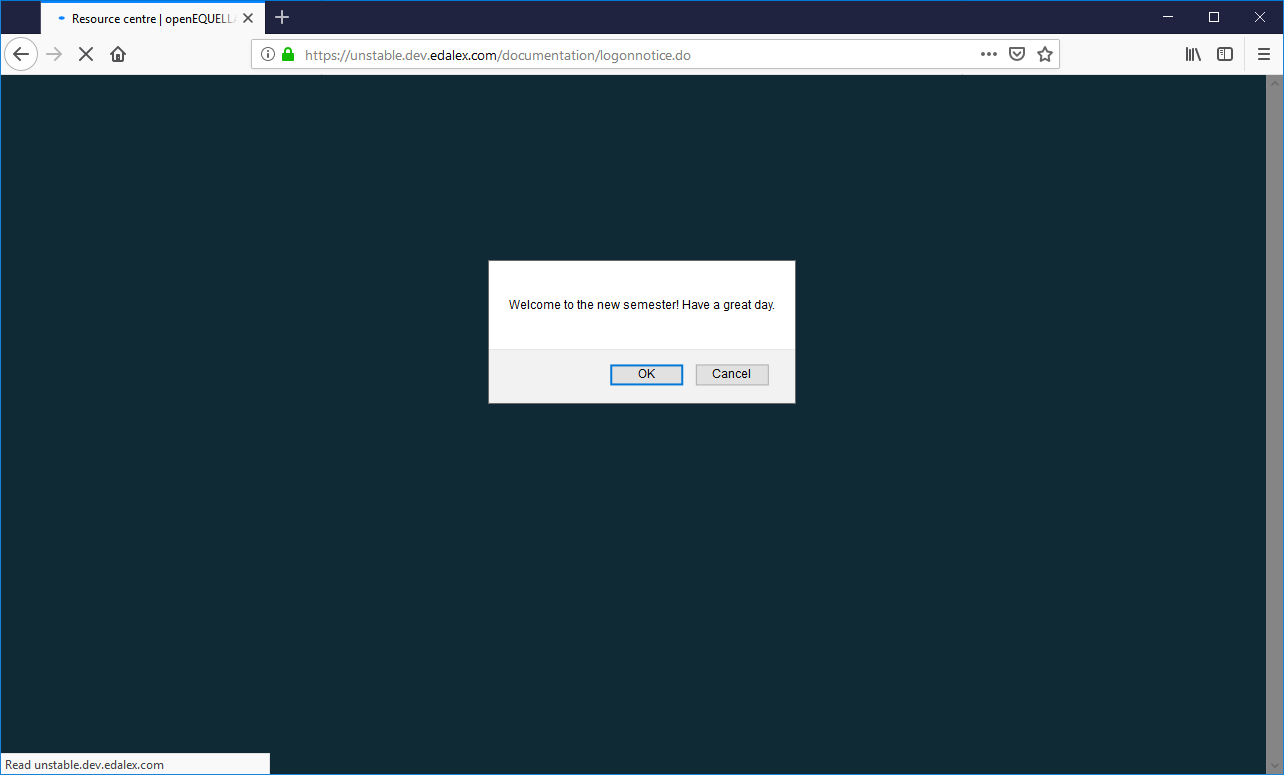 Figure 6 Existing ‘After login’ notice
Accessing the Login notice editor
The Login notice editor is accessed from Settings > General settings > Login notice editor. An example is shown in Figure 7.
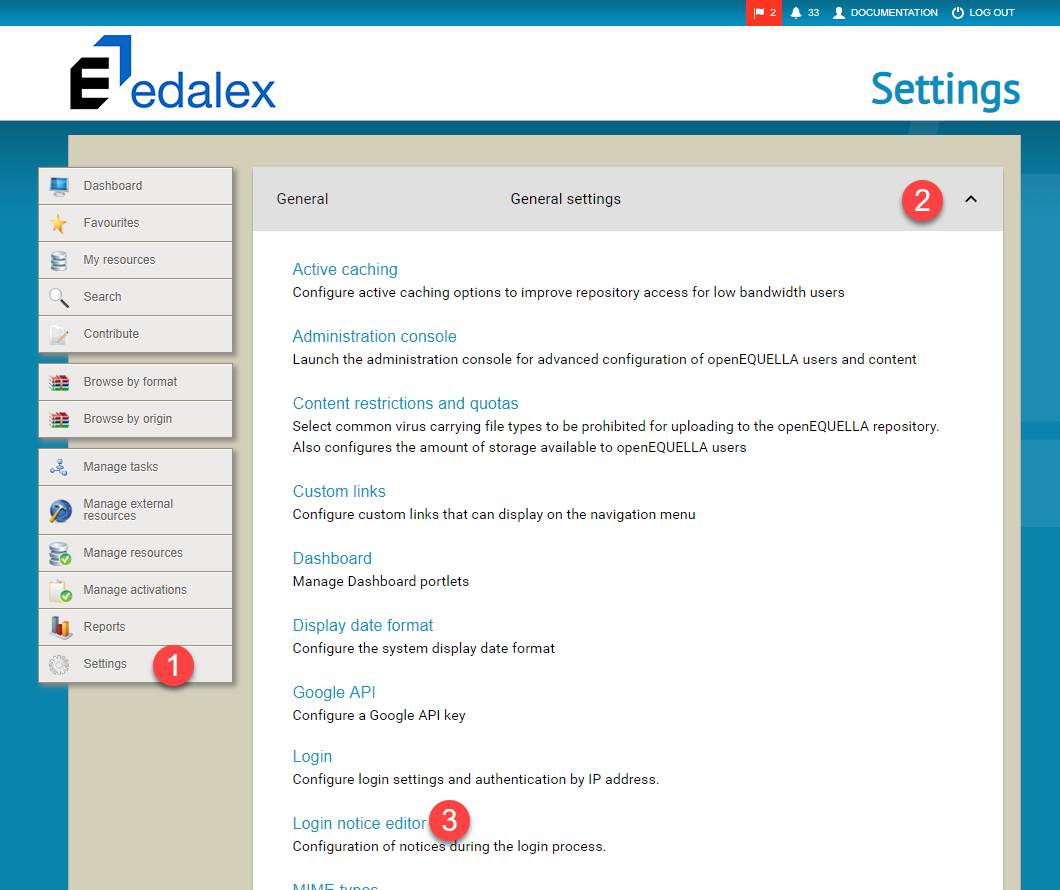 Figure 7 Accessing the Login notice editor
Login notice editor page
The Login notice editor page displays two tabs, BEFORE LOGIN NOTICE and AFTER LOGIN NOTICE. It also displays a Back arrow beside the page heading in the top left (Login notice editor) that is used to return to the Settings page without saving any changes made in the Login notice editor. An example is shown in Figure 8.
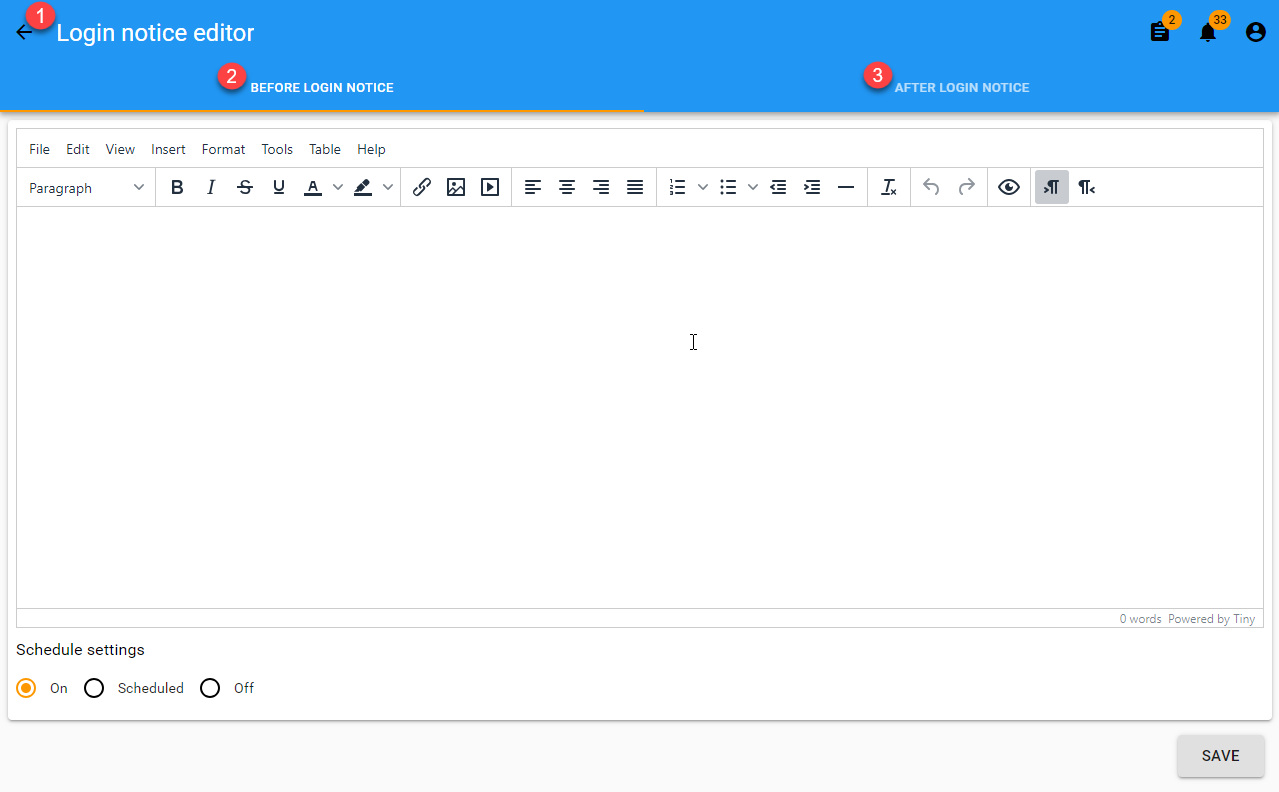 Figure 8 Login notice editor page
Before login notice tab
The BEFORE LOGIN NOTICE tab allows a notice to be created and formatted to display to users on the openEQUELLA Login page. It can be displayed based on the scheduling options selected. The tab includes:
-
Rich text editor – allows administrators to add and format text, images, videos, links and more. Images can be based on a URL or simply pasted into the editor.
-
Schedule settings – select from On (display on the login page), Scheduled (display for the time period configured) and Off (do not display).
-
SAVE button – saves changes.
An example showing content added using the rich text editor is shown in Figure 9.
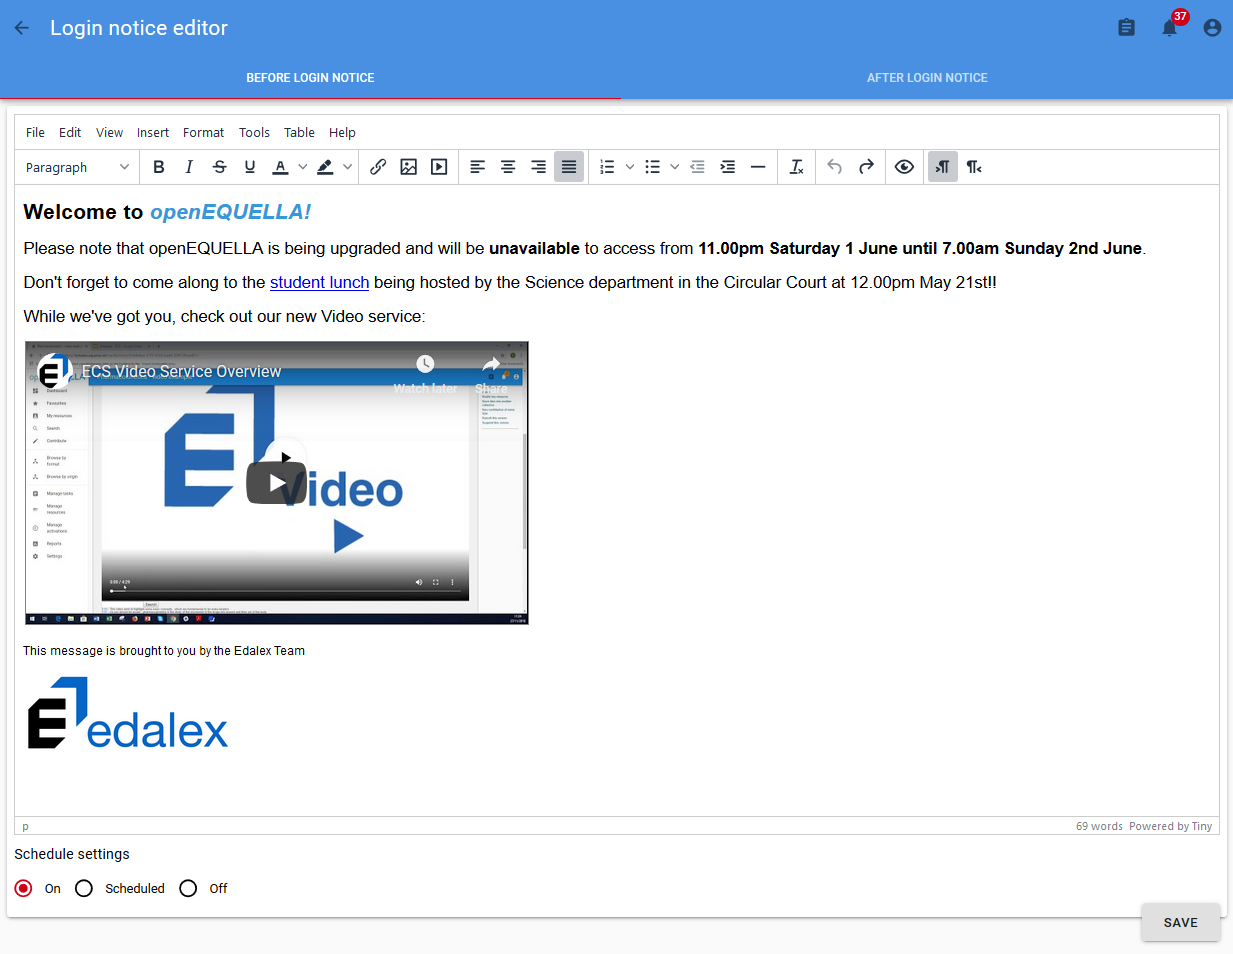 Figure 9 BEFORE LOGIN NOTICE tab
Schedule settings
The Schedule settings section enables the Before login notice to be set to:
-
On – the notice always displays on the login page.
-
Off – the notice will not display on the login page.
-
Scheduled – the notice displays on the login page only between the configured dates and times. Clicking in the Start date and End date fields displays a date and time picker. Once the end date and time is reached, the notice no longer displays.
An example is shown in Figure 10.
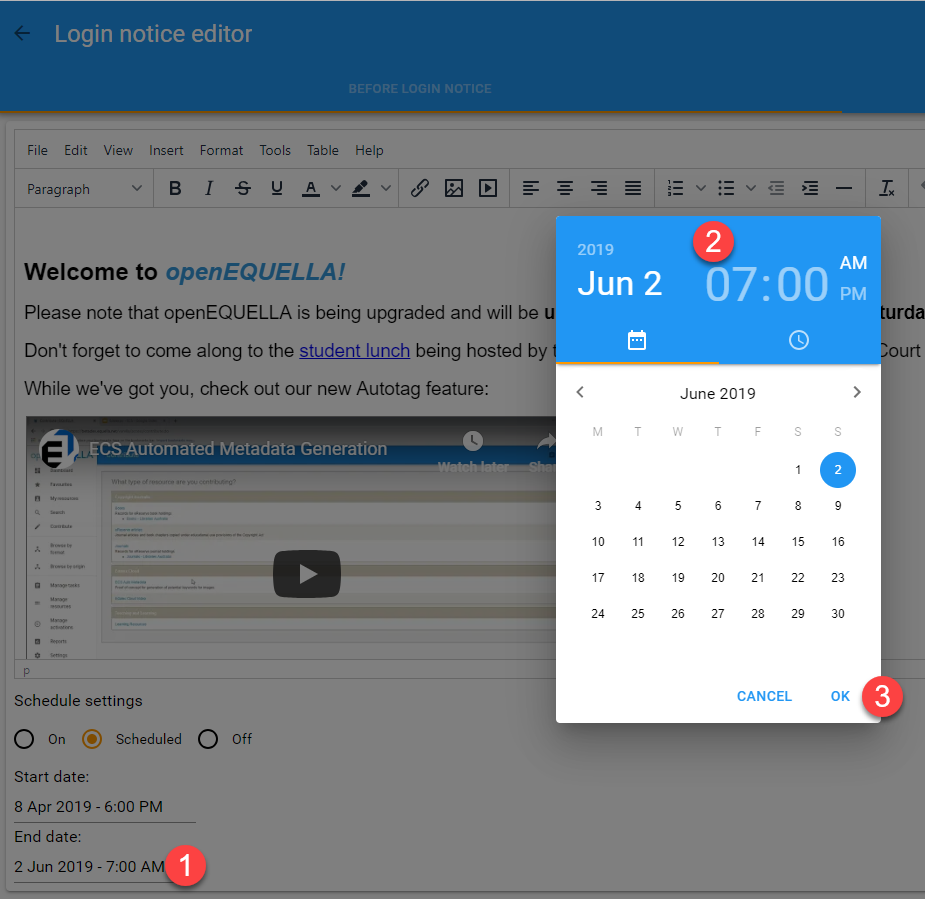 Figure 10 Schedule settings with Date/Time picker
After Login Notice tab
The AFTER LOGIN NOTICE tab allows a simple text notice to be entered to display to users in a popup dialog box once they’ve logged in. The tab includes:
-
Text box – to enter notice message.
-
CLEAR button – clears the current message.
-
SAVE button – saves changes.
An example is shown in Figure 11.
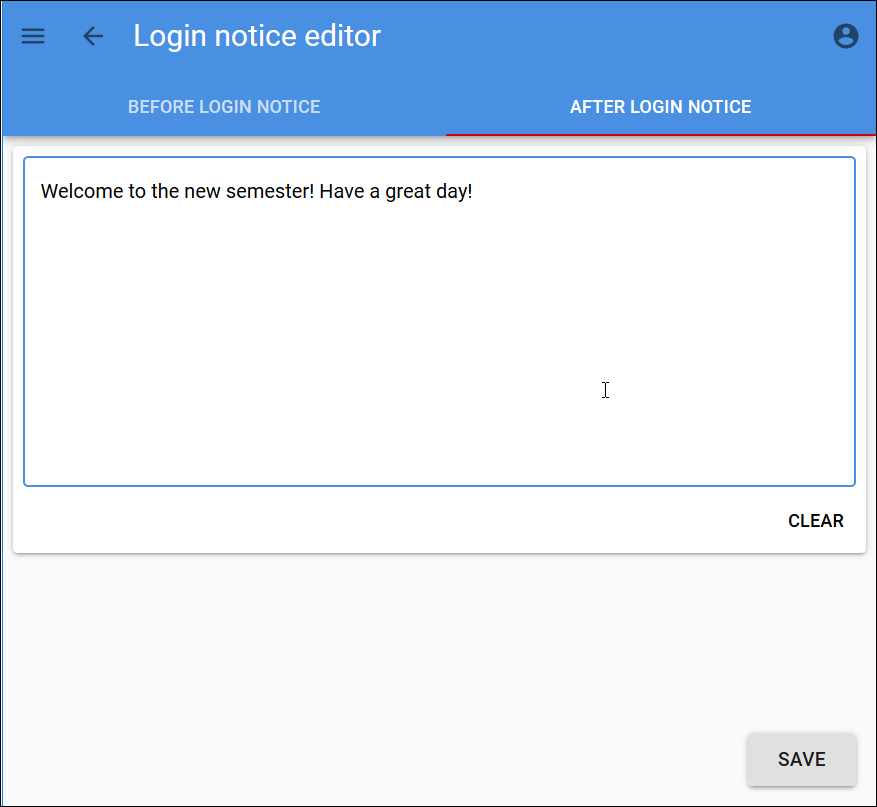 Figure 11 AFTER LOGIN NOTICE tab
Support for Languages other than English
In openEQUELLA, language packs can be used to control the language within display areas of the system. openEQUELLA 2019.1 expands its support for languages other than English in its search capabilities (such as recognising the specified language’s stop words, stemming, etc.).
The default openEQUELLA search language is English, but this can be changed by
editing the optional-config.properties file to specify the required default
search language (using the Alpha-2 country
code).
To edit the default search language
-
Go to the openEQUELLA directory on your system and open the
learningedge-configfolder. -
Open the
optional-config.propertiesfile using your text editor of choice. -
At the bottom of this file, uncomment (remove the
\#in front of) thefreetext.analyzer.languageproperty and add= xx(where xx is the Alpha-2 country code) (see example in Figure 8).Note that the Alpha-2 country code must be entered in lower case.
-
Restart the openEQUELLA server.
An example where the required search language is German is shown below.
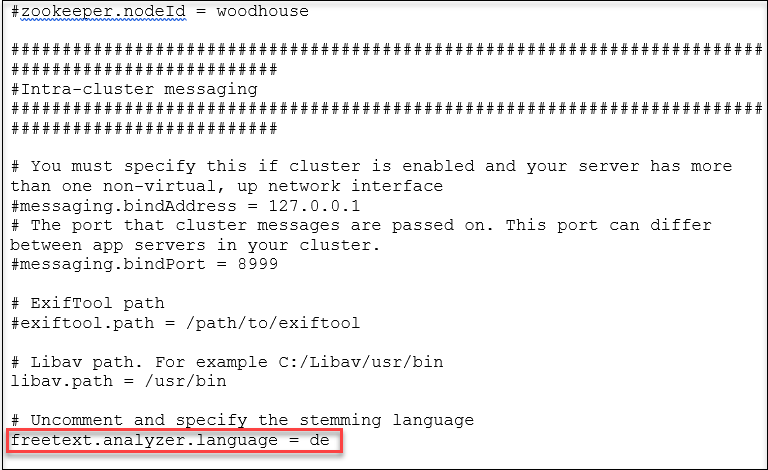
Figure 12 optional-config.properties file – ‘freetext.analyzer.language’ property
REST API Enhancements
See
Cloud Providers
openEQUELLA introduces the ability to add a Cloud provider. Cloud providers can be developed by third parties in order to deliver cloud services to openEQUELLA.
The process of signing up for a Cloud provider service (for example, ECS AutoTag) takes place outside of openEQUELLA, and as part of that process the Cloud provider supplies a service URL and possibly credentials for the registration process. During registration, openEQUELLA and the Cloud provider authenticate using these credentials resulting in a bi-directional communication channel.
Once openEQUELLA is successfully registered, the Cloud provider has the means to automatically add and update wizard controls in the Collection Definition Editor (e.g. the ECS AutoTag control), which enables the service to be incorporated in contribution wizards.
Cloud provider permissions
The MANAGE_CLOUD_PROVIDER ACL needs to be granted to the relevant
administrators before they can register a new Cloud provider. This is done
through the Security Manager, accessed via the Administration Console. An
example is shown in Figure 13.
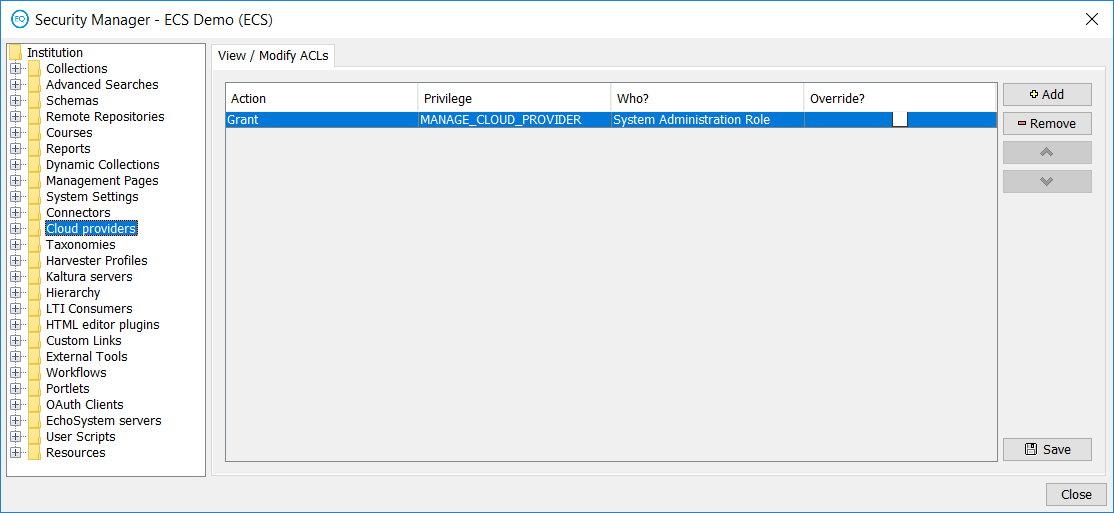 Figure 13 Security Manager - Cloud providers
Registering a Cloud provider
To register a Cloud provider
-
From the openEQUELLA Settings page, select Integrations > Cloud providers.
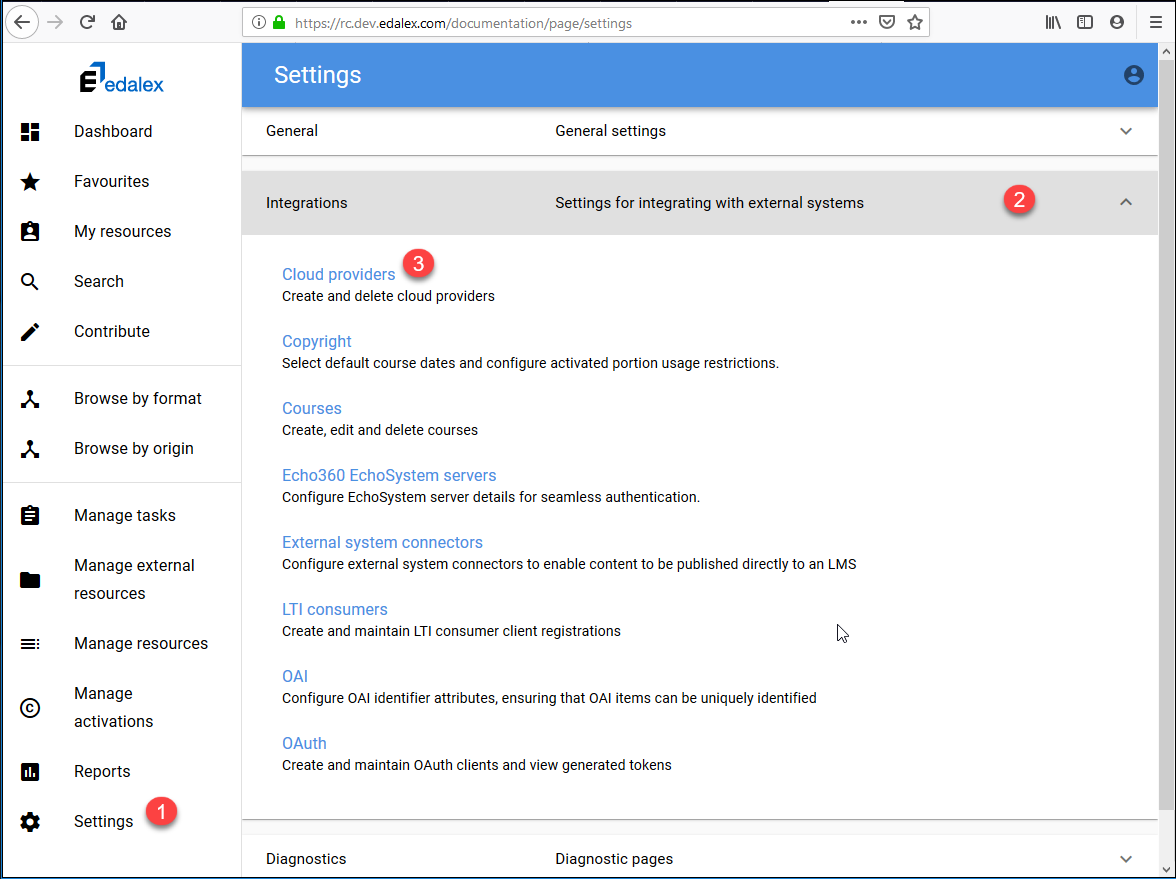 Figure 14 Settings, Integrations, Cloud providers
The Cloud providers page displays. An example is shown in Figure 13.
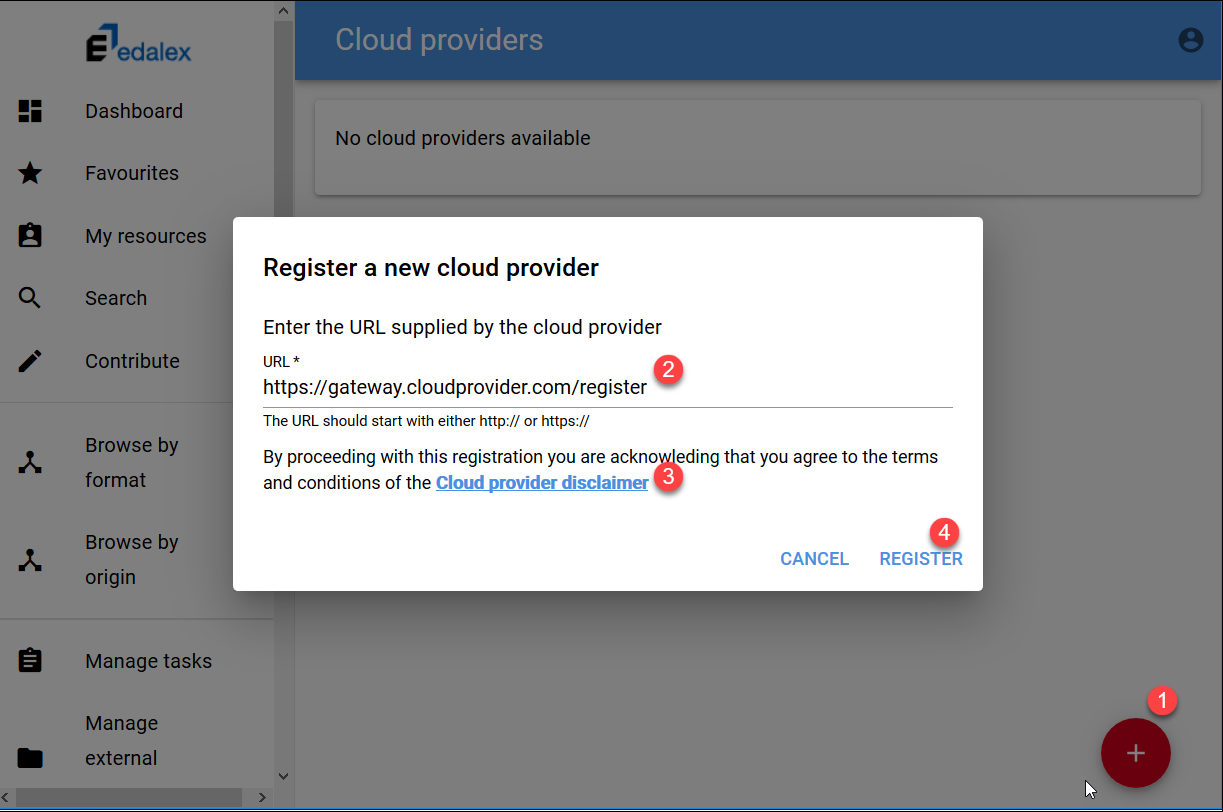 Figure 15 Cloud provider registration page
 -
Click the Add (Plus) button to open the Register a new cloud provider dialog.
-
Enter the registration URL supplied by your Cloud provider, view the Cloud provider disclaimer then click REGISTER.
-
A registration form requiring you to enter credentials or displaying other information may display, depending on the Cloud provider’s process. An example of the Edalex Content Services registration form is shown below:
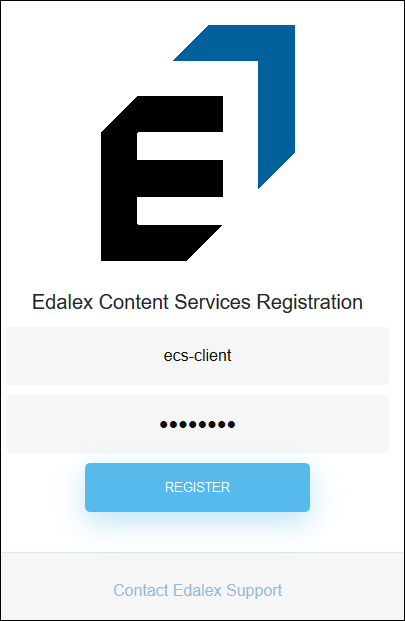
Figure 16 Example registration form
-
Enter the required information (e.g. username and password provided to you by the Cloud provider) then click REGISTER.
The registration and authentication process occurs in the background and once completed successfully, the Cloud provider information displays on the Cloud providers page. An example is shown in Figure 17.
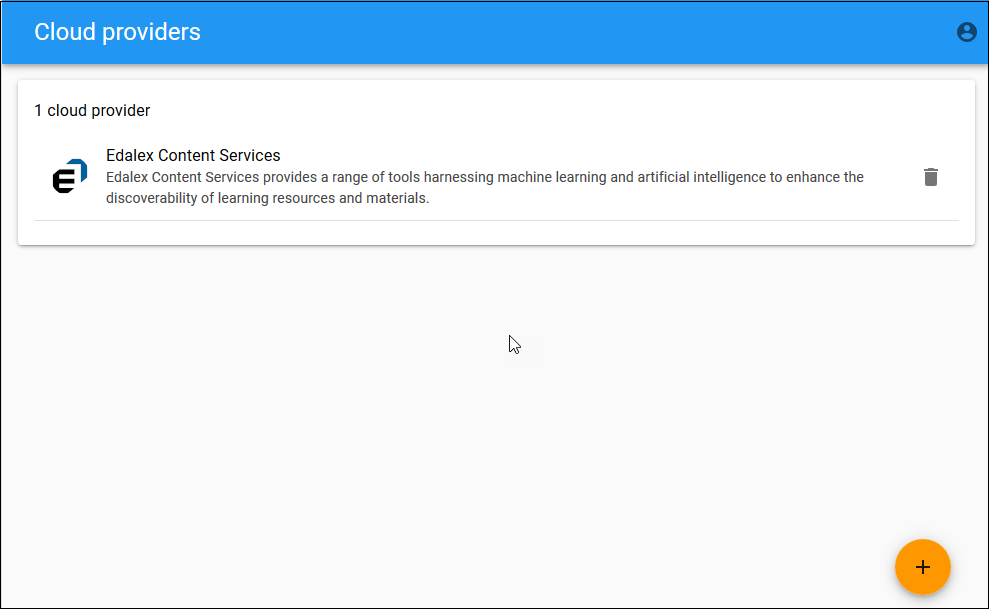 Figure 17 Cloud providers page with registered Cloud provider
Enhanced Blackboard Integration
The openEQUELLA / Blackboard integration has historically been achieved with a building block and web service that was uploaded into the Blackboard site. This has historically presented some difficulties and Blackboard is retiring their SOAP Web Services in Q2 2020 which will effectively break the openEQUELLA web service. Due to this upcoming loss of functionality, and the complexity of maintaining the building block and web service, a pure LTI / REST integration is being developed. This integration is available in this release as a ‘beta’ feature with a minimal set of functionality, and will be enhanced for 2019.2.
As part of migrating from the building block and web service integration to the LTI / REST integration, adopters will have access to the following Blackboard abilities:
- Course Content Deep Linking Tool (works in 2019.1)
- Course Tool (on the roadmap)
- System Tool (on the roadmap)
Adopters will no longer be able to use the ‘My Institution’ integration that was part of the building block and web service integration.
Enable Using Blackboard REST APIs
In order to make REST calls into a Blackboard site, adopters will need to obtain a REST Application ID via https://developer.blackboard.com/ . This REST Application ID will then be used (via the same site), to create a REST Application key and secret that is tied to your Blackboard site URL. You will need this key and secret when configuring the integration in Blackboard. Please read this post for more information on how Blackboard handles REST Application IDs.
Configure openEQUELLA
Configure a new LTI Consumer
This is a standard LTI Consumer in openEQUELLA, so only a high level review is provided.
- Under Settings > Integrations > LTI Consumers, click on Create new LTI consumer.
- You can leave the ‘Consumer key’ and ‘Consumer secret’ with the system-generated values, or specify your own.
- Choose your SSO configuration and role mappings. For testing, leave Useable by as Everyone, and set Unknown user handling to Create local user and add them to the following groups…. Then choose a group for all ‘new’ Blackboard users crossing over to openEQUELLA to be added to.
Configure a new External System Connector
- Under Settings > External system connectors, click on Add new connector.
- Select Blackboard REST.
- Configure a Connector name, and provide a Blackboard REST URL.
- Click on Test URL. Ignore the Test web service button. This will be removed in 2019.2.
- Specify the REST API Key and REST API Secret from https://developer.blackboard.com/ .
- The rest of the configuration is standard External System Connector details.
Configure Blackboard
Register the Provider Domain
- Under System Admin > LTI Tool Providers, select Register Provider Domain.
- Configure the Provider domain. So for
https://my.learning.center/oeq, you would putmy.learning.center. - Set Provider Domain Status to
Approved. - Under Default Configuration, set Default Configuration to Set globally.
- Configure the Tool Provider Key and Tool Provider Secret with the values you configured in the
openEQUELLA LTI Consumer. - Configure the Tool Provider Custom Parameters with the following. Note, omitting the
bb_user_login_idline will result in the LTI crossover (SSO into openEQUELLA) using the Blackboard user’sexternalIdinstead of theuserName.bb_user_login_id=@X@user.id@X@ bb_user_id=@X@user.batch_uid@X@ - Under Institution Policies, set Send User Data to Send user data only over SSL.
- Note: You can select Send user data over any connection, but it is not recommended for a Production install.
- Set User Fields to Send to Role in Course, Name, and Email Address.
- Set Allow Membership Service Access to Yes.
Configure Course Content Tool Placement
- Under the newly registered provider domain, select Manage Placements.
- Select Create Placement.
- Configure the label and description.
- Configure the handle (this cannot change after the placement is created).
- Leave Availability set to Yes.
- Set Type to Course content tool, and then select Supports deep linking.
- Under Tool Provider Information, set the Tool Provider URL to
{https://your.oE.domain.xyz/demo/}blackboardltisignon.do. - The Tool Provider Key and Tool Provider Secret will be preconfigured (and readonly).
Configure the REST Application in Blackboard
- Under System Admin > REST API Integrations, select Create Integration.
- Configure the Application ID from your registration on https://developer.blackboard.com/ .
- Select a ‘Learn User’ that has sufficient permissions.
- Leave End User Access as the default Yes.
- Leave the Authorized To Act As User as the default Service Default (No).
Usage
Permissions
Grant the following to your openEQUELLA users
EXPORT_VIA_CONNECTOR,EXPORT_TO_LMS_ITEM,VIEWCONTENT_VIA_CONNECTOR,FIND_USES_ITEM- Push to LMS / Find Uses / Manage External Resources.INTEGRATION_SELECTION_SESSION- LTI launch from Blackboard to openEQUELLA to the selection session pageDISCOVER_ITEM- Discover openEQUELLA items in a search (such as from the selection session). Allows some of the metadata to show.VIEW_ITEM- View attachments from an LTI launch, view attachments from a selection session.
Add an openEQUELLA content link with the Course Content Tool Placement
In an original Blackboard course, navigate into {your course} > Information > Build Content > your-oEQ-CTT-placement . This is known as ‘Pull to LMS’. Currently only works for original Blackboard courses. Ultra courses are planned for 2019.2.
Other integration abilities
The rest of the integration abilities are similar to the building block and web service flows:
- ‘Push to LMS’
- From openEQUELLA, select courses / folders to integrate content links from a given openEQUELLA resource.
- Currently only works for original Blackboard course. Ultra courses are planned for 2019.2.
- Manage External Resources
- Not working in 2019.1.
- Find Uses
- Not working in 2019.1.
Notes
- The default REST Application ID adopters obtain is at the ‘developer’ level - there is a 7 Blackboard site limit, and API call rate limits. It is recommended openEQUELLA / Blackboard adopters reach out to their Blackboard Support contacts to discuss the appropriate REST Application ID level for their institution.
- The Blackboard REST integration can be enabled / disabled with the Available flag in Blackboard.
- A good write up of the configuration options for Blackboard REST applications is here.
- Since this feature is in ‘beta’, adopters that plan to switch from the building block and web service integration to the LTI / REST integration by Q2 2020 are encouraged to try out the new functionality, and along with the functionality mentioned in the 2019.2 Milestone, ensure it will be sufficient for their openEQUELLA / Blackboard integration user scenarios.
- If you get an error in openEQUELLA
CacheLoader returned null for key TOKEN., confirm your Blackboard REST Application is configured and available.